Making Snow Pictures Look Less Grey

After the snow falls and school is cancelled for the day, the first thing the kids want is to bundle up and build a snowman. And we can’t help but grab our cameras and shoot the whole process. Sometimes, you’ll find the snow in your uploaded photos looks slightly grey and/or the overall picture is on the darker side. One way to fix this before you shoot is to adjust your exposure using the exposure compensation dial (see photo below and be sure to look this up in your manual). See, your camera’s meter reads the whole scene as very bright since there is so much white all around your subject. In turn, the camera closes the aperture a bit to make what it believes to be the proper exposure (like squinting when it’s too bright out, your camera wants to put on sunglasses).

exposure-compensation-4-2-650x0So you need to trick your camera and “add” more light by holding down your exposure compensation dial (+/-) and moving the thumb wheel to add exposure by going to the plus side. I usually add +0.7 when shooting in snow. The result is a bright picture and whiter snow. So next time there’s snow by you and you go snowshoeing or help the kids with their snowman, add some extra exposure (+0.3~+1.0) before you start shooting.


Fine-Tuning the Color Cast in Your Photos: Custom White Balance

sidebyside_WB

One of the great advantages of digital photography is the ability to fine-tune the color of your photos pretty easily. There are many ways to do this including after the fact using photo editing software, adjusting custom image settings (like portrait, landscape, etc) though menus on your camera, and even the old fashioned way: using a filter. Filters were commonly used to remove the color cast of certain lighting when using daylight balanced film, or vice versa. Today, however, you can easily fine-tune the color by experimenting with your white balance settings. First, I suggest you review this white balance download card. Second, locate the white balance button on your camera (the button is usually designated by WB and is found on either the back or top right of your camera). If you hold this button down and use your scroll wheel, you will be able to move through the various white balance settings (consult your camera manual if your camera does not operate this way). Most often, AWB (automatic white balance) does a fine job of adjusting the color cast of the lighting to make sure white looks white and black looks black. However, sometimes the photo may  look too orange (or blue, magenta or green) for your taste. To fine-tune, you can select one of the pre-set modes. Just decide what type of light is hitting your subject and set the WB to the corresponding icon (see the download card again).

If you still find the color to not be what you are looking for, then it may be time to experiment with CUSTOM WHITE BALANCE. I will admit, I have not done much with custom white balance as I feared it was too difficult and only for real professionals. However, I have discovered it is really easy to set a custom white balance and the difference in color can be night and day. I used a custom white balance this holiday season in a relative’s living room that has consistently given me an issue the past few years, even when using a flash. This year’s holiday photos were much more pleasing as a result.

To set a custom white balance, follow these easy steps:
1) Hold down your WB button and scroll to PRE or Custom
2) Hold down the WB button until PRE or Custom blinks
3) Point your camera at a white piece of paper that is close to your subject or hold an “expodisc” (my tool) over your lens and point it towards the light source
4) Press the shutter release button as if you were taking a photo and look at the LCD on your camera to confirm the camera states “Good” (If not, try steps 3-5 again). No photo will actually be taken.
5) Take pictures
Note: if you use an expodisc, put your camera in manual focus to take the WB shot and then put it back into autofocus before taking photos.

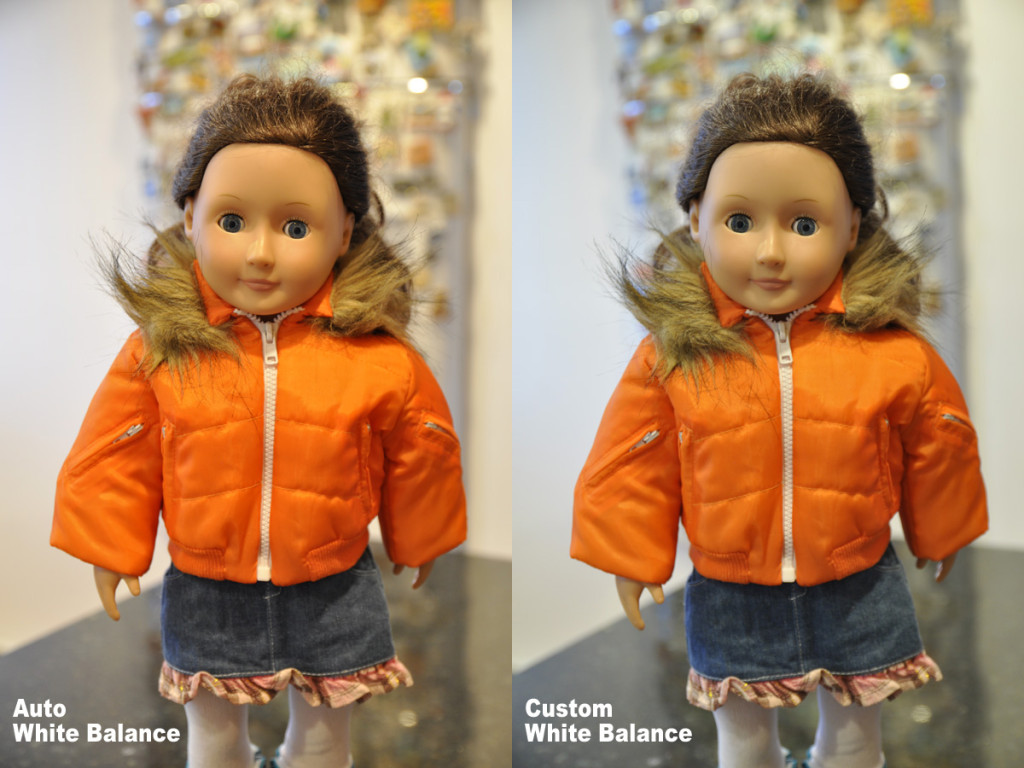
The samples above of “Marabelle” show a distinct change in color cast. The AWB gave me an orange cast from the tungsten lighting in the room. The preset tungsten white balance setting gave me the same result. But by following the steps above, I was able to get a more accurate color rendition of Marabelle, her clothing and the surroundings. For example, look closely at the white zipper in each photo and the black marble counter top. Places where custom white balance can make a huge difference include stage lighting and gym lighting (look for a future post on this regarding the atrocious mercury vapor lighting in the gym where we play basketball) where the camera’s presets may have a hard time perfecting the white balance. So, if you are up to experimenting with this technique, I highly recommend it as yet another way to improve your photos and even save some time editing them later on. If you find yourself using a custom white balance often, then take a look at ExpoDisc or other products like it to make the job easier.
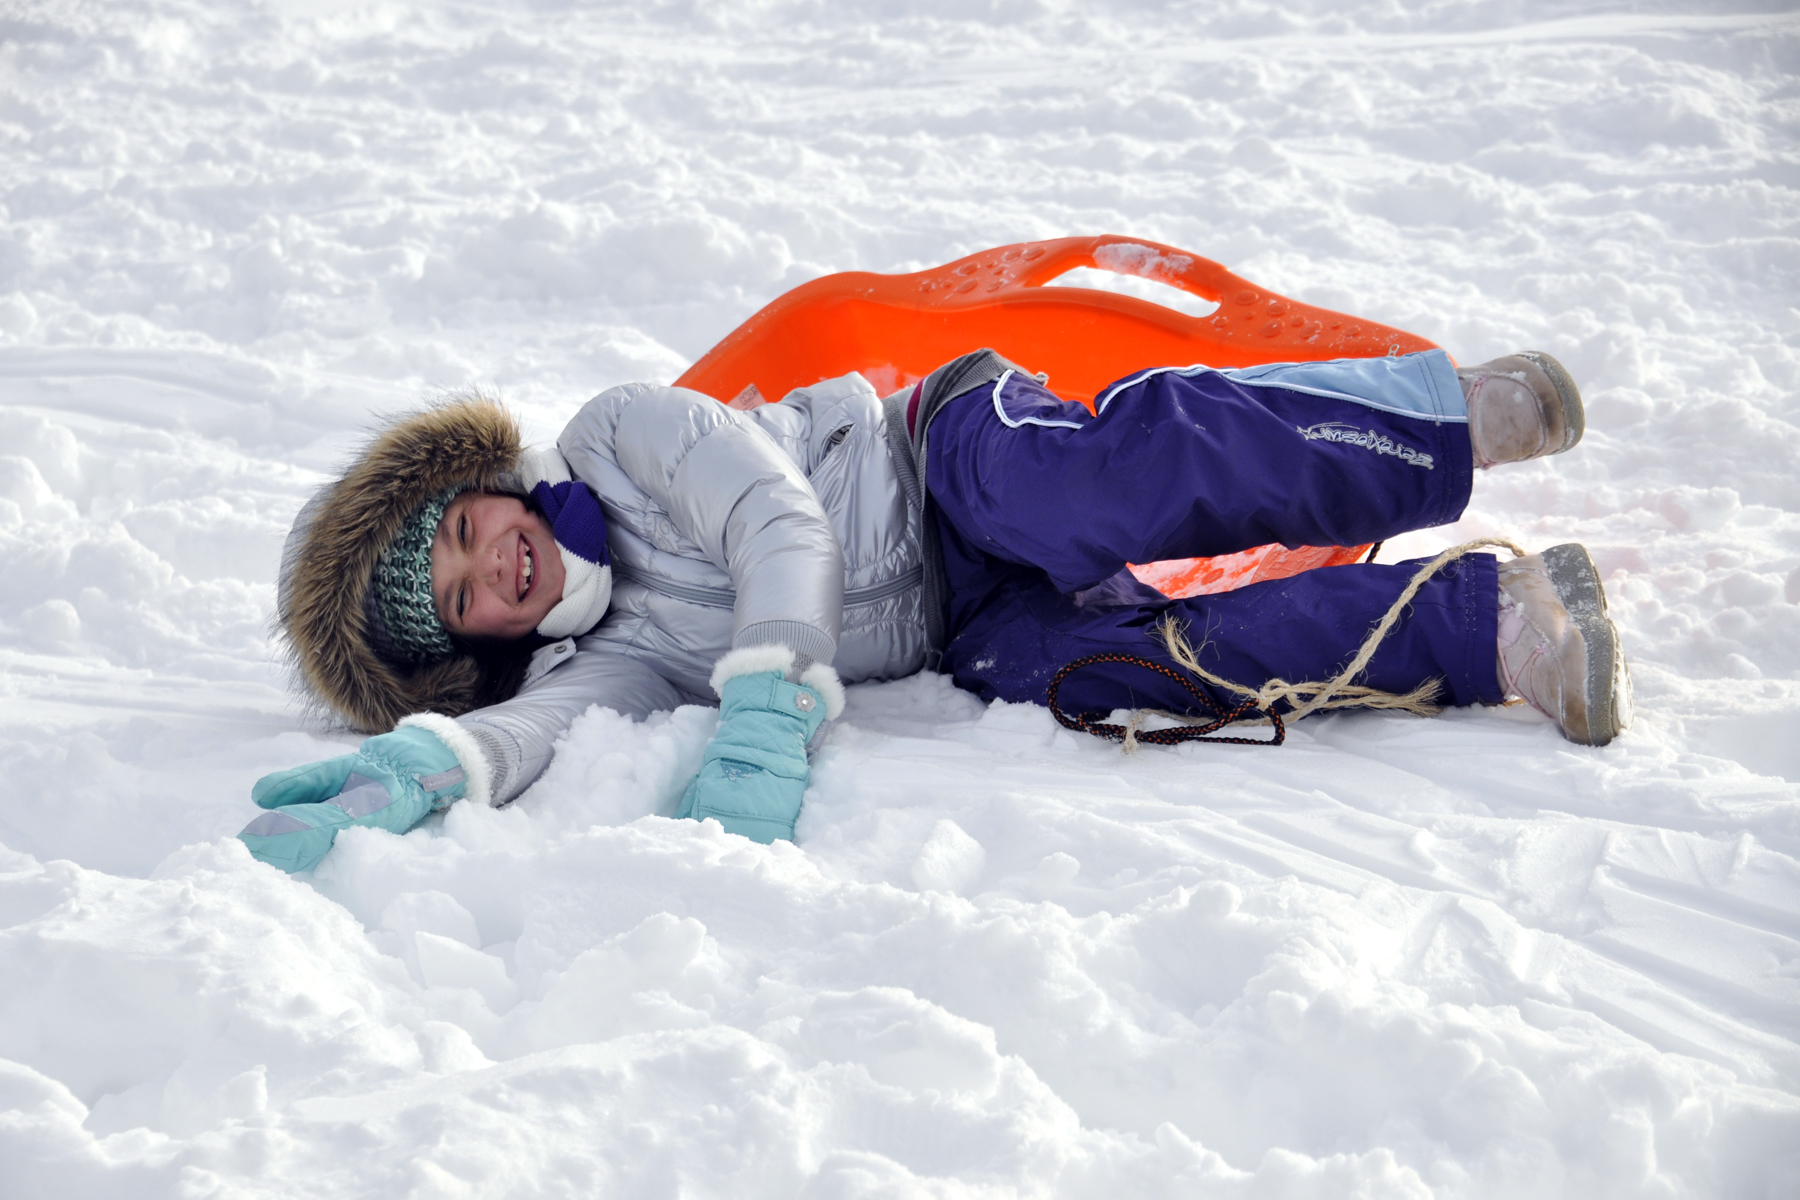
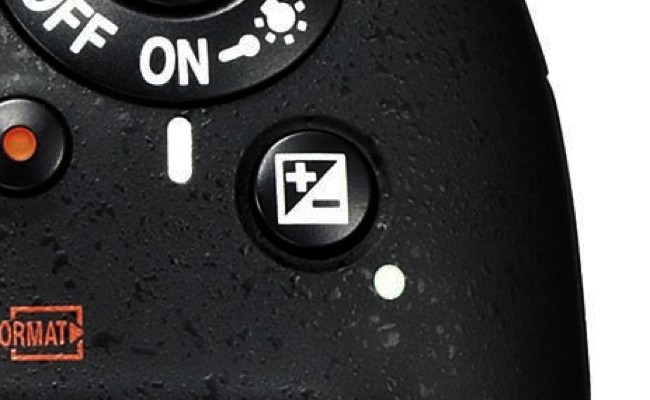
Holiday Portraits Using the Night Portrait Scene Mode

nite_portrait_flash
I rarely use the scene modes on my camera, but the one I find myself using from time to time is the Night Portrait mode. This scene mode is the one with the icon featuring a person and star  or moon (see typical camera mode dial below). I use this mode when I want a person as my main subject, but the special lighting in the background, like Christmas lights, Times Square lighting, or a sunset, is equally important. In this photo, my subject posed in front of the town’s decorated gazebo and lit tree.
night portrait mode on dial
The Night Portrait mode sends out a burst of the flash to capture the subject and than makes the shutter stay open a little longer to capture the lighting in the background. The trick in this mode is to be sure both you and your subject hold still to avoid unwanted blur from camera shake or subject movement. In fact, my subject did move and her hands are slightly blurry due to the very slow 1/10 sec shutter speed required to achieve the effect. But the expression was just what I hoped for, so for me, it’s perfect. I boosted the ISO considerably—to 1000— and I opened my aperture to F/5, the widest setting for this situation, in order to make the lights softer in the background. Using the Night Portrait mode helped me take the guess work out of deciding how to set my flash and shutter speed and instead concentrate on snapping away until I got what I was looking for. So pose your kids in front of the tree or outdoor decorations, or position your family along the railing at sunset on your next cruise, set the camera to Night Portrait mode and see what you can get!

Take a Stop Action Photo

DSC_3800_RT

Freezing a droplet of water or a smiling face zipping past you on a bike both require using a fast shutter speed and usually a higher ISO setting. I prefer to set my camera on aperture priority in order to prevent under-exposing my shot. In this shooting mode, using a wide open aperture like F/2.8, F/3.5 or F/5.6 will let a lot of light into the camera, and the camera will then automatically choose the fastest shutter speed it can—given the ISO setting and your lighting conditions. If it is a bright day, the shutter speed will be higher in this mode when using a wide aperture. And the higher you set your ISO, the higher the resulting shutter speed will be. So start with your camera in the “A” or “AV” mode, set the aperture to a wide open setting, and set your ISO at 400. Look thru the camera and see what shutter speed your camera says it will use. If it is slower than 1/500th of a second, then boost your ISO to 800, or 1000. Keep in mind that if your subject is moving very fast, you may need a very high shutter speed, like 1/1000th or 1/1250th in order to freeze the motion. To refresh your memory about aperture priority, take a look at the aperture download card posted here. Take a break from raking leaves, grab the camera and take a few shots of autumn fun. Or, if it is already snowing in your part of the country, take some creative snowball fight shots. Use a fast shutter speed to capture sports action, falling confetti, sprinkler water and more.

Boost Your ISO and Take Photos Without Flash

Boost ISO ComparisonSometimes the best indoor photos are taken without flash. Natural lighting is, well, so much more natural. The photo on the left is taken at ISO 200 with my built-in flash. The colors are accurately represented. And the noise (grain) is tight and sharp. But compare it to the photo on the left. Look at how you can see the night light and almost read the numbers on the clock radio? You can even see the wood floor in the room. That’s because I did not use a flash and boosted my ISO considerably in order to get enough light to really make this photo work. I boosted the ISO all the way up to 1600. And the image is lit well because I used a very slow shutter speed, which allowed the ambient light in the room (the light in the shot, the light in the room behind me and the lights along the curtains) to record onto the CCD. The shot is certainly grainy, and the color is not as accurate as in the image on the left, but given a choice, I definitely prefer the right side. It has more dimension and life. Boosting your ISO makes the chip more sensitive to light, so you can shoot in lower light and still get the shot. In this case, my light level was so low, that even at ISO 1600 and with my aperture opened all of the way to let in the maximum amount of light through the lens, my shutter speed was very slow-just one quarter of a second (1/4). So I had my VC image stabilization feature on my lens switched on for this shot to be sure I could hand-hold the camera without getting blur.(Left: 18mm; F/9; 1/60th sec; ISO 200; flash fired. Right: 18mm; F/6.3; 1/4th sec; ISO 1600; no flash).

Free Photo Tips Card Download 2: White Balance

Download the second set of photo tips cards on White Balance and add them to the first set about Aperture. I hope you find this set useful as you shoot. Experiment with your white balance outdoors to warm up or cool a shot. Click here to download.

Free Photo Tips Card Download 1: Aperture

TIPS CARDS_final.psd

I’m using my time in the airport in Palm Springs (I’m painfully early for my flight and it’s 112 degrees outside so I can’t even enjoy the outside cafeteria) to finish and upload the first of what I hope will be many free download cards. These will be a series of cards that you can print out and keep with you to refer to when you’re out shooting. The first is about aperture priority mode. I’ve covered this topic a lot since I feel it is the most important technique to master to make better photos. Understanding what is does allows you to be more creative since you can force the outcome of your image to better tell your story. And we all know practice is the best way to master any technique. So print out this first set of cards on one letter-size sheet of photo paper (luster is best since it won’t scratch as much). Then cut the paper along the grey lines to give you a set of four cards. If you like, punch a whole in the corners and put them on a D-ring key chain and attach them to your camera bag. You could even have them laminated at your local office supply store. This is the first set of Chasing Picture Perfection Tips Cards. Download the file at this link http://www.4shared.com/file/119167214/5e95ce94/TIPS_CARDS_final.html

Fireworks Photos are a Blast!

_DSC2987_RT

Fireworks photos are easy to shoot if you have a great position and a stable tripod or surface for your camera (or a lens with image stabilization like my 18-270mm VC zoom). I set the camera to manual mode (off of the program or aperture priority shooting mode I usually use). I also set the camera to manual focus. Since the sky is dark, the camera cannot focus so you need to manually set the lens’ focus ring to infinity. Next, I boosted the ISO to 1000. And finally, I set the lens to my widest aperture (F/6.3) and a slow 1/15th of a second shutter speed. The slow shutter speed captures the streaks of the fireworks’ bursts nicely (but the slow shutter speed can lead to some blur if you are hand-holding or shooting without a tripod and cable release–did you know that even when your camera is on a tripod, the act of pressing the shutter release button can cause blur?). If you get too much blur, move your shutter speed to 1/30th of a second, but your streaks may not be as long. I did have a nice position on the patio of a beautiful bed and breakfast where a friend was staying (we were so pleased that she invited us all to watch with her!). There was a nice break in the trees that looked out over the LI Sound. While the fireworks we saw were not Macy’s quality, they were fun for the kids, we oohed and aahed, and I felt I got a few good shots to include in my scrapbook page for this year’s holiday. Perfect end to a Happy 4th of July Day! (270mm; ISO 1000; F/6.3; 1/15th sec.)

Unclutter Your Photo’s Background

earring_F6_150

Understanding the function of F-stops, or the aperture of your lens, is undeniably the most confusing of your DSLR’s features. However, once you master it, you will make a huge leap forward in the quality of your photos.

As a photo student in high school and college, I stuck a slip of paper onto the back of my camera (yes, in film days SLRs had a bookplate slot on the back of the camera where you slipped in a flap from your film box so that you could remember what film you had loaded. Can you imagine?!). On this slip I wrote, “open aperture=blurry” and “small aperture=sharp.”

An open aperture lets in a lot of light. On your lens it is a setting like F/2.8, 3.5, 5.6, or 6.3. Think of the aperture as your eye’s pupil. If there is not much light, your pupil gets bigger, or “opens” to let in more light. But a big result of using an open aperture is the effect of a blurry background that really makes your subject pop off the page (or screen). You can easily control the aperture setting on your camera by putting the camera on “A” and dialing in one of the aforementioned numbers. Your camera will automatically pick a shutter speed to make a proper exposure.

If you have a distracting background, dialing in a wider (or open aperture) will make the background blurry and eliminate the distractions. However, maybe you want the background really clear. Like if you’re standing in front of a sign that you want to be able to read in the photo. Then you would dial in a small aperture.

In this first photo, her eye is in focus, but her earring is not, and neither is the tip of her nose. I was just a few feet away and had the camera set to “A” (Aperture Priority) and dialed in F/6.3. Now conversely, if you choose a small aperture, like F/22 or F/32, your background will appear more sharp. Again, imagine a bright sunny day and how your pupils react: they get smaller and let in less light. But also, think about when you squint and how things get clearer. This is sort of how a smaller aperture works. In the second photo, I dialed in F/32 and her earring is now in more focus.

{F/6}

{F/6}

{F/32}

{F/32}


{F/6.3}

{F/6.3}

{F/22}

{F/22}

Lawn Angels: Blurring and Freezing Motion in Photos

LawnAngel_Blur

I set out to take two contrasting photos in order to visually demonstrate the effect different shutterspeed settings will have on your photos. Check it out! I got a shot that reminds me of snow angels! The shot above was taken at very slow shutterspeed (1/6 second), so the action is blurred. Most of the time when we take a shot that’s blurry, we delete it. Right? But take a second look. Sometimes there’s a story or an emotion that’s told because of the blur! My lawn angel spun until she was dizzy while I snapped away on the deck that gave me more of a “bird’s eye” view. The elevated position also allowed me to keep the lush green grass as a backdrop and eliminate from the shot the distracting cars and more in front of the house. I set my camera to aperture priority and selected a small aperture (f/18) and lowered the ISO to 200. These settings ensured that I would get a slow shutterspeed and blur the action.
LawnAngel_Freeze

The contrasting shot above turns my angel into a statue, yet there is still a joy about the image since you can clearly see her face. But I may have to tell you that she was spinning or you might think she’s just breaking out into song or feeling the breeze. But whatever story you put to the image, it’s still joyous. To freeze the action, I moved the settings to the opposite end: the aperture was changed to the widest opening I could select (F/6.3) and I raised the ISO to 800. This ensured that I would get a faster shutterspeed of 1/200 sec.
So slow down a bit, literally, by capturing the movement in your active kids! Summer is the perfect time to try-jumping into and out of the pool, racing in the yard, playing jump rope, simply jumping, sliding into home plate, and so much more. And don’t delete the shots off your camera. Download them and take a closer look. You might be surprised at what you get. (PS-I am working on freebie cards for basic photo tips, so keep a look out for those).