Take a Photo that Demonstrates the Rule of Thirds

_DSC4304_RT_150

The rule of thirds is one of the most powerful creative options you have when composing your photograph. A photo that has the important element of the photo at an intersecting point of a “tic tac toe” board, or in one of the right or left, top or bottom thirds of the photo, is one that is more compelling  than a shot with the subject centered.

_DSC4304_RT_150_wgrid
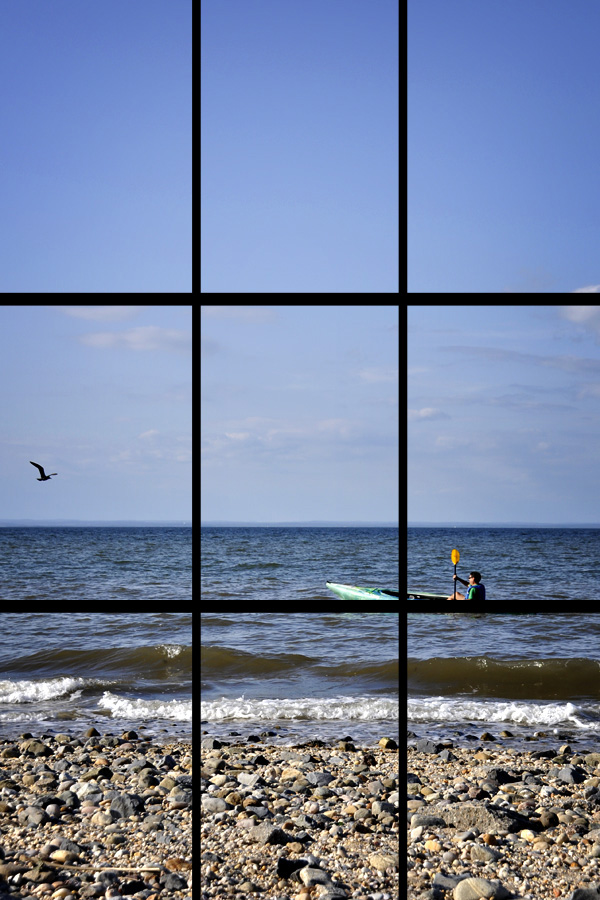
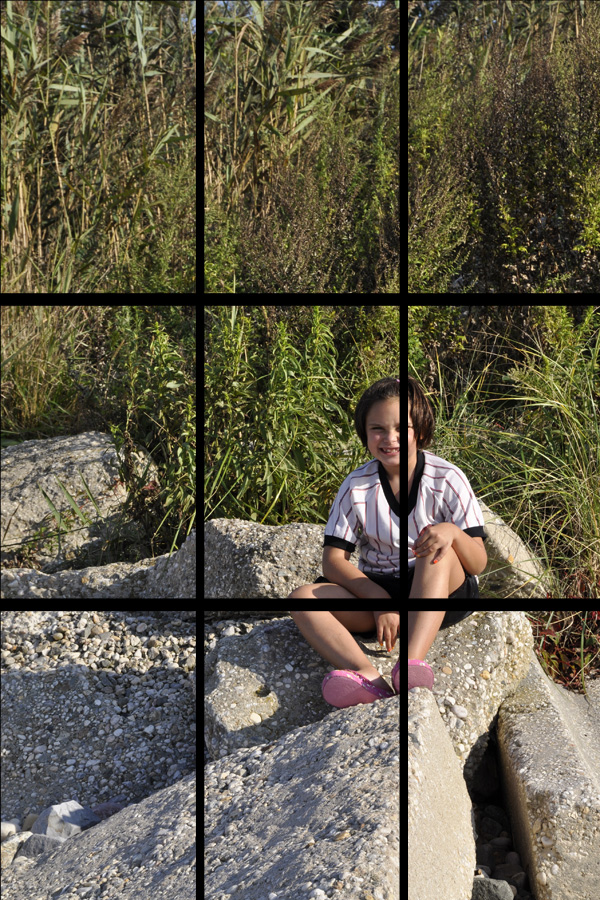
Most often, you don’t want to position your subject smack dab in the center of the frame. It’s boring. Although, this rule, like all rules, can be broken very effectively. That really depends on the shot. But if you start to think about not putting you subject in the center of the frame, you will train your eye to see better shots. For example, the eye closest to the camera should hit one of the intersecting points. Or the critical part of the landscape should be in the top third or bottom third, left third or right third. My shot here shows the subject off to the right slightly and in the lower portion of the frame. This gives the subject breathing room in the frame, the “white space” (which does not have to be white, but rather unimportant or non-distracting space in the frame) gives your eye a place to rest and then come back to the subject, and by positioning the subject as I did, you get a feeling of where she is and that where she is important to me and therefore should be to the viewer as well. Below is another example. This time a vertical landscape that also adheres to the rule of thirds. I added the tic tac toe board to both images also so that you can get a better idea of where the intersecting points or thirds of a frame are.
_DSC4279_RT_150 _DSC4279_RT_150_wgrid

End of Summer Photo Lesson: Shooting in Open Shade

_DSC4032_RT

When the sun is really harsh, you can still get wonderful portraits by placing your subjects just inside a shady area. This might be just under an umbrella (like my example of these gorgeous siblings), inside a garage door, inside your house door, under the slide at the park, under the light of the first tree, etc. The key is to not position your subject too deep into the shade. You want all of the light that is just behind you to spill softly onto your subjects. This will give even lighting across the face(s) as well as great light in the eyes. (65mm -cropped; F/5.6; ISO 400).

BONUS Lesson: This second photo was also taken in the open shade of a small umbrella on a very bright beach. Here you can actually see just how close they are positioned to the edge of the shade. But I am throwing this in to illustrate leading lines. Your eye naturally goes to the boy first and follows down the line to the sitting girl, but notice how the lines of the table push your eye right back up again. This is a great way to keep your viewer engaged within the image.(55mm; F/5.6; ISO 400)_DSC4035_RT

Window Light Portraits

DSC_0628_RT4x6jpg

A few things to keep in mind when taking a portrait of a person or pet by window light:

ONE: Natural window light usually means wide open apertures and slower shutter speeds, so consider boosting your ISO if necessary, be sure your anti-shake mode is on, or use a tripod to prevent camera shake.

TWO: The closer you are to a window, the more dramatic the shadow on the opposite side of the face will be. Positioning your subject further from a window means softer, more even light.

THREE: You can actually stand in front of the window and position your subject facing the window and it won’t cast a shadow! This results in very flat lighting on the face. Four, shoot by a window even if it is overcast or there are soft sheer curtains. The light will be beautiful.

Use Your Flash for Outdoor Photos

fill flash_blog post

We all have heard the rule that early morning and late afternoon are the magical times for talking photos. But let’s face it. At noon, we’re at the pool or the beach. Noon is when the action is happening and when we are more likely to be taking photos. So in order to avoid the raccoon eyes that come with overhead noon time light, just turn on your flash! The small burst of light will fill in shadows and make your subject’s eyes pop out just like it did for my subject. Look at the shot on the left with no flash. Harsh shadows fill in the eye sockets and the shadow is strong across her shoulder and neck. For the shot on the right, I just popped up my built-in flash and it makes a world of difference. To avoide over-exposing your subject, one trick is to dial in a small aperture like F/16 or F/22. For some people, images that use fill flash may appear to be too artificial. If you find the flash puts out too much light, there is a setting on most DSLR cameras whereby you can “compensate” the flash in a plus (+) or minus (-) direction. Dial in a -1 or -2 flash compensation and the flash will emit less light to fill in shadows more subtly. (For that tip, however, you will have to break out your camera manual to find the setting). So next time you’re at the pool or beach this summer, and you cannot get your subject under an umbrella, or tree or some other type of open shade during those harsh hours between 11am and 3pm, then try popping up your flash! (25mm; F/16; ISO200)

Don’t Leave Home Without Your Camera

NYC_STORE_1That’s of course one of the tricks to getting a good photo. Just keep taking pictures! But even when your doing some of the most mundane things, you might just find some perfect light and a child with a great attitude for the day! Here are two shots from our recent overnight in NYC. We went window shopping down in SOHO and while in a furniture store, she sat down while we browsed. When I checked on her, I noticed that the window light streaming in from the high broad windows was beautiful. Her eyes just sparkled when she looked up at me. Of course, I said, oh, you look so pretty, stay right there! The warm tones in the store made it even more beautiful and she cooperated for two or three shots. (32mm; F/5; ISO 400).

NYC_STORE_2
At the next store, there were floor to ceiling windows all around the 2nd floor store. And she picked up a nice prop- a bouquet of artificial sunflowers – and promptly sat on the floor in front of the window. Because I was so close to her, not more than five feet, and used a focal length slightly more than normal (65mm), the flowers are out of focus. (65m; F/5; ISO 400). For both shots, I had my camera in aperture priority mode so that I could always pick the most wide open aperture I could get given the lighting. This way I ensured the background would be a little softer to make her pop out. And I always focus on the eyes (or the eye that is closest to the camera).

Guest Post at Elementally Speaking

BALLERINA

My friend CrisDee over at Elementally Speaking asked if I would guest post for her site where she shares with you ideas for creating, capturing and keeping family memories.(see the post below, or at http://elementallyspeaking.wordpress.com/2009/07/06/new-feature-photo-tips-from-stacie-errera/Thanks Cris!)

When it comes to our children’s stage performances, it is very difficult to get great shots unless you have total access during a rehearsal. The mistake most people make is to take photos from their seat in the auto mode.  If you do this, the flash will go off and you’ll get a dark stage and very well lit heads of the people in front of you.  So sit back and enjoy you child’s live performance with your eyes rather than through your camera’s viewfinder (I know, any of us shutterbugs find this an almost impossible suggestion!).Instead, concentrate on getting a nice shot of your child in costume by venturing back stage during rehearsals or prior to the performance.  I checked on my daughter the day before her recital and saw her costume for the first time.  I was thrilled when I saw the light streaming in from the windows behind the back stage curtains.  I asked her to sit down for a moment with the side of her face parallel to the windows to get nice side lighting on her face.  I then crouched down just a little so that I could see her ballerina skirt spread all around her and her big happy smile.  This point of view also let me include some of the wood floor that her pretty feet danced on the next day and one that really gives the viewer the true picture of what was happening when I took the photo.  Find a place in the environment that has some windows and position your actor or dancer so that the light brings out the detail in the costume and a highlight in your child’s eyes.  Don’t get too close to the window as the light will be too harsh.  Instead, move a few feet or more away from the window for an even light.  I always try to not use the flash and opt for natural light whenever possible.

Unclutter Your Photo’s Background

earring_F6_150

Understanding the function of F-stops, or the aperture of your lens, is undeniably the most confusing of your DSLR’s features. However, once you master it, you will make a huge leap forward in the quality of your photos.

As a photo student in high school and college, I stuck a slip of paper onto the back of my camera (yes, in film days SLRs had a bookplate slot on the back of the camera where you slipped in a flap from your film box so that you could remember what film you had loaded. Can you imagine?!). On this slip I wrote, “open aperture=blurry” and “small aperture=sharp.”

An open aperture lets in a lot of light. On your lens it is a setting like F/2.8, 3.5, 5.6, or 6.3. Think of the aperture as your eye’s pupil. If there is not much light, your pupil gets bigger, or “opens” to let in more light. But a big result of using an open aperture is the effect of a blurry background that really makes your subject pop off the page (or screen). You can easily control the aperture setting on your camera by putting the camera on “A” and dialing in one of the aforementioned numbers. Your camera will automatically pick a shutter speed to make a proper exposure.

If you have a distracting background, dialing in a wider (or open aperture) will make the background blurry and eliminate the distractions. However, maybe you want the background really clear. Like if you’re standing in front of a sign that you want to be able to read in the photo. Then you would dial in a small aperture.

In this first photo, her eye is in focus, but her earring is not, and neither is the tip of her nose. I was just a few feet away and had the camera set to “A” (Aperture Priority) and dialed in F/6.3. Now conversely, if you choose a small aperture, like F/22 or F/32, your background will appear more sharp. Again, imagine a bright sunny day and how your pupils react: they get smaller and let in less light. But also, think about when you squint and how things get clearer. This is sort of how a smaller aperture works. In the second photo, I dialed in F/32 and her earring is now in more focus.

{F/6}

{F/6}

{F/32}

{F/32}


{F/6.3}

{F/6.3}

{F/22}

{F/22}

Lawn Angels: Blurring and Freezing Motion in Photos

LawnAngel_Blur

I set out to take two contrasting photos in order to visually demonstrate the effect different shutterspeed settings will have on your photos. Check it out! I got a shot that reminds me of snow angels! The shot above was taken at very slow shutterspeed (1/6 second), so the action is blurred. Most of the time when we take a shot that’s blurry, we delete it. Right? But take a second look. Sometimes there’s a story or an emotion that’s told because of the blur! My lawn angel spun until she was dizzy while I snapped away on the deck that gave me more of a “bird’s eye” view. The elevated position also allowed me to keep the lush green grass as a backdrop and eliminate from the shot the distracting cars and more in front of the house. I set my camera to aperture priority and selected a small aperture (f/18) and lowered the ISO to 200. These settings ensured that I would get a slow shutterspeed and blur the action.
LawnAngel_Freeze

The contrasting shot above turns my angel into a statue, yet there is still a joy about the image since you can clearly see her face. But I may have to tell you that she was spinning or you might think she’s just breaking out into song or feeling the breeze. But whatever story you put to the image, it’s still joyous. To freeze the action, I moved the settings to the opposite end: the aperture was changed to the widest opening I could select (F/6.3) and I raised the ISO to 800. This ensured that I would get a faster shutterspeed of 1/200 sec.
So slow down a bit, literally, by capturing the movement in your active kids! Summer is the perfect time to try-jumping into and out of the pool, racing in the yard, playing jump rope, simply jumping, sliding into home plate, and so much more. And don’t delete the shots off your camera. Download them and take a closer look. You might be surprised at what you get. (PS-I am working on freebie cards for basic photo tips, so keep a look out for those).

Sideline Shooting

SOCCER_2
Today was her last game of the season (they tied 1-1). And today was the first time I shot a game this season. Shooting any sport from the sidelines can be challenging. But I’ve found a few of the following tips to be useful. First, make sure your camera is set to aperture priority and select the widest aperture you can with your lens. This way, your camera will always choose the fastest shutter speed for you. Plus, you’ll bring the focus on your subject since the background will then blur out a little.

SOCCER_1

Set your ISO a little higher (400 or 800 if sunny; 1000 if overcast) to ensure faster shutter speeds to stop the action. (If you have a point and shoot camera, try setting the camera on the sports mode). Next, put your camera on both the continuous auto focus and continuous shooting mode. If you have to lift your finger after each shot to take the next, you’re guaranteed to miss something. If you’ve ever had the opportunity to watch a pro shoot, you’ll remember that their finger stays on the shutter release until the ball is out of play! You almost feel as if you’re watching a video when you review their thousands of shots. For sure, knowing the game is a big help since you can anticipate where the action will be. But, if you’re sports-challenged like me, then following the ball through your viewfinder will naturally keep you where the action is and then start pressing the shutter as soon as your child enters the frame. You may also choose to follow your child, but then you sort of miss the game. Another good tip is to not stay in one place. If your child plays on the same side as where you are seated (left wing, e.g.), you may wind up shooting a lot of his or her back. If you venture to the opposing side, on your team’s goal end, you may have a better chance at getting a shot of them facing you rather than the back of their jersey. And of course, your positioning may need to change throughout the game, so be prepared to walk/run the field on a day you plan to take lots of photos. Crouch down once in a while to get a different perspective, and zoom in on details like cleats and balls to make a full story for your album, photo book, scrapbook or digital frame. And last but truly not least, make sure you have a lens that can zoom over a wide range so you can get in close when the action is far down the field (a lens that goes up to around 300mm on a digital SLR is ideal) and you can capture it all as the action gets close to the sidelines by zooming out to a wide angle setting. Additionally, while you still may want to crop in a little closer later on, the closer you are to start, the better quality your cropped photo will be in the end. (ISO 400; 232mm; 1/1250 sec; F/6.3)

Too Much Tilt In This Photo? Yeah, You’re Right.

Yes, too much leaning to the right. Or is that the left? But I love the expression. It is so hard to get natural expressions from her these days. I am sure this is true of all kids her age.

TOO MUCH TILT

They become more self-conscious. More goofy. They think they’re Miley Cyrus posing for CD cover (check out the tween star earrings I let her wear on weekends now). So this was a shot in-between the aforementioned less than desirable looks/poses. I just love her face. And the color! Posed in the shade of the garage in front of the sunny and colorful azalea bushes, she pops off the background. To get this effect, I set the camera to aperture priority and opened up to F/5.6 (my widest opening on this lens, at this focal lenth, in this light, at this ISO). Setting your camera to the portrait scene mode would give you a similar result. The wide open aperture makes the background blurry and soft. But I’ve got to admit it, my attraction to tilting (seeMarch 13 post) did not work out in this photo so much. I’ll try tilting it back a little in photoshop. But love the smile and that’s what really counts. (F/5.6; 1/125 sec; 400 ISO; 60mm with VC on).