Change Your Position for Better Photos

shoot from above
Just like changing the scenery can give us a whole new outlook and change our mood, so does changing your position when taking a photo. It is very common for all of us to just shoot pictures from a standing position, but this leads to somewhat boring images. We have all gotten a much better shot just by crouching down or standing on a chair or bench. Not only do you get a whole new perspective, but this helps to eliminate distracting backgrounds for a clean, more professional look. For this shot, I was standing on the bulkhead while my subjects were down on the shore, allowing me to give a real sense of where they are since I was able to show both the sand and the beach grass in the shot. Plus, the busy background harbor was now out of the shot. Look for the next photo tips card download about positioning yourself for better photos to come shortly (see previous photo tips cards: #1 here; and #2 here).

End of Summer Photo Lesson: Shooting in Open Shade

_DSC4032_RT

When the sun is really harsh, you can still get wonderful portraits by placing your subjects just inside a shady area. This might be just under an umbrella (like my example of these gorgeous siblings), inside a garage door, inside your house door, under the slide at the park, under the light of the first tree, etc. The key is to not position your subject too deep into the shade. You want all of the light that is just behind you to spill softly onto your subjects. This will give even lighting across the face(s) as well as great light in the eyes. (65mm -cropped; F/5.6; ISO 400).

BONUS Lesson: This second photo was also taken in the open shade of a small umbrella on a very bright beach. Here you can actually see just how close they are positioned to the edge of the shade. But I am throwing this in to illustrate leading lines. Your eye naturally goes to the boy first and follows down the line to the sitting girl, but notice how the lines of the table push your eye right back up again. This is a great way to keep your viewer engaged within the image.(55mm; F/5.6; ISO 400)_DSC4035_RT

Window Light Portraits

DSC_0628_RT4x6jpg

A few things to keep in mind when taking a portrait of a person or pet by window light:

ONE: Natural window light usually means wide open apertures and slower shutter speeds, so consider boosting your ISO if necessary, be sure your anti-shake mode is on, or use a tripod to prevent camera shake.

TWO: The closer you are to a window, the more dramatic the shadow on the opposite side of the face will be. Positioning your subject further from a window means softer, more even light.

THREE: You can actually stand in front of the window and position your subject facing the window and it won’t cast a shadow! This results in very flat lighting on the face. Four, shoot by a window even if it is overcast or there are soft sheer curtains. The light will be beautiful.

Use Your Flash for Outdoor Photos

fill flash_blog post

We all have heard the rule that early morning and late afternoon are the magical times for talking photos. But let’s face it. At noon, we’re at the pool or the beach. Noon is when the action is happening and when we are more likely to be taking photos. So in order to avoid the raccoon eyes that come with overhead noon time light, just turn on your flash! The small burst of light will fill in shadows and make your subject’s eyes pop out just like it did for my subject. Look at the shot on the left with no flash. Harsh shadows fill in the eye sockets and the shadow is strong across her shoulder and neck. For the shot on the right, I just popped up my built-in flash and it makes a world of difference. To avoide over-exposing your subject, one trick is to dial in a small aperture like F/16 or F/22. For some people, images that use fill flash may appear to be too artificial. If you find the flash puts out too much light, there is a setting on most DSLR cameras whereby you can “compensate” the flash in a plus (+) or minus (-) direction. Dial in a -1 or -2 flash compensation and the flash will emit less light to fill in shadows more subtly. (For that tip, however, you will have to break out your camera manual to find the setting). So next time you’re at the pool or beach this summer, and you cannot get your subject under an umbrella, or tree or some other type of open shade during those harsh hours between 11am and 3pm, then try popping up your flash! (25mm; F/16; ISO200)

Don’t Leave Home Without Your Camera

NYC_STORE_1That’s of course one of the tricks to getting a good photo. Just keep taking pictures! But even when your doing some of the most mundane things, you might just find some perfect light and a child with a great attitude for the day! Here are two shots from our recent overnight in NYC. We went window shopping down in SOHO and while in a furniture store, she sat down while we browsed. When I checked on her, I noticed that the window light streaming in from the high broad windows was beautiful. Her eyes just sparkled when she looked up at me. Of course, I said, oh, you look so pretty, stay right there! The warm tones in the store made it even more beautiful and she cooperated for two or three shots. (32mm; F/5; ISO 400).

NYC_STORE_2
At the next store, there were floor to ceiling windows all around the 2nd floor store. And she picked up a nice prop- a bouquet of artificial sunflowers – and promptly sat on the floor in front of the window. Because I was so close to her, not more than five feet, and used a focal length slightly more than normal (65mm), the flowers are out of focus. (65m; F/5; ISO 400). For both shots, I had my camera in aperture priority mode so that I could always pick the most wide open aperture I could get given the lighting. This way I ensured the background would be a little softer to make her pop out. And I always focus on the eyes (or the eye that is closest to the camera).

Guest Post at Elementally Speaking

BALLERINA

My friend CrisDee over at Elementally Speaking asked if I would guest post for her site where she shares with you ideas for creating, capturing and keeping family memories.(see the post below, or at http://elementallyspeaking.wordpress.com/2009/07/06/new-feature-photo-tips-from-stacie-errera/Thanks Cris!)

When it comes to our children’s stage performances, it is very difficult to get great shots unless you have total access during a rehearsal. The mistake most people make is to take photos from their seat in the auto mode.  If you do this, the flash will go off and you’ll get a dark stage and very well lit heads of the people in front of you.  So sit back and enjoy you child’s live performance with your eyes rather than through your camera’s viewfinder (I know, any of us shutterbugs find this an almost impossible suggestion!).Instead, concentrate on getting a nice shot of your child in costume by venturing back stage during rehearsals or prior to the performance.  I checked on my daughter the day before her recital and saw her costume for the first time.  I was thrilled when I saw the light streaming in from the windows behind the back stage curtains.  I asked her to sit down for a moment with the side of her face parallel to the windows to get nice side lighting on her face.  I then crouched down just a little so that I could see her ballerina skirt spread all around her and her big happy smile.  This point of view also let me include some of the wood floor that her pretty feet danced on the next day and one that really gives the viewer the true picture of what was happening when I took the photo.  Find a place in the environment that has some windows and position your actor or dancer so that the light brings out the detail in the costume and a highlight in your child’s eyes.  Don’t get too close to the window as the light will be too harsh.  Instead, move a few feet or more away from the window for an even light.  I always try to not use the flash and opt for natural light whenever possible.

Photo of Grandma Plus Four. Um, Five!

MOTHER'SDAY

The light filled the screened porch room late afternoon on Mother’s Day. So I put down my Bellini (a cocktail I’d never had before but thoroughly enjoyed) and picked up my camera before the sun went down. Luckily, the grand kids were quite cooperative. I asked the smallest to sit on Grandma’s lap. The older girl sat on the opposite side on the arm of the chair. And I asked the boys to stand behind Grandma. And just as I asked them to all lean in toward Grandma, and the boys to bring their heads and shoulders in a little closer (to prevent them from dropping out of focus), Kelsey decided she wanted in! Kelsey is a Soft-coat Wheaton Terrier newly adopted by my mother. She just wanted to get in on the action. So she was a fifth “person” in the photo, and mom lifted Kelsey up just a little higher to get her head in good position. Then the kids all squeezed in and we got this lovely picture for mother’s day. I did not use a flash. No? No. The highlights in everyone’s eyes are from the beautiful window right behind me. I cropped out the TV in the background to make this a nice 5×7 for Mom’s house, but you can see me in it taking the picture and the window too. So, be sure to always look for a window. Even on an overcast day you’ll get brilliant looking portraits when you use the window as your light source. Two, get the kids (and pet) on several different levels to make a nice composition. Notice how those beautiful smiles make a ring around their beaming grandma! And three, use the stabilizer feature on your lens as I did to get a blur free shot. And four, go with the flow. You never know who might pop into your viewfinder! (ISO 200; 32mm; F/4; 1/25 sec, Auto WB; Aperture Priority)

Father Daughter Portraits

DANCE PORTRAIT

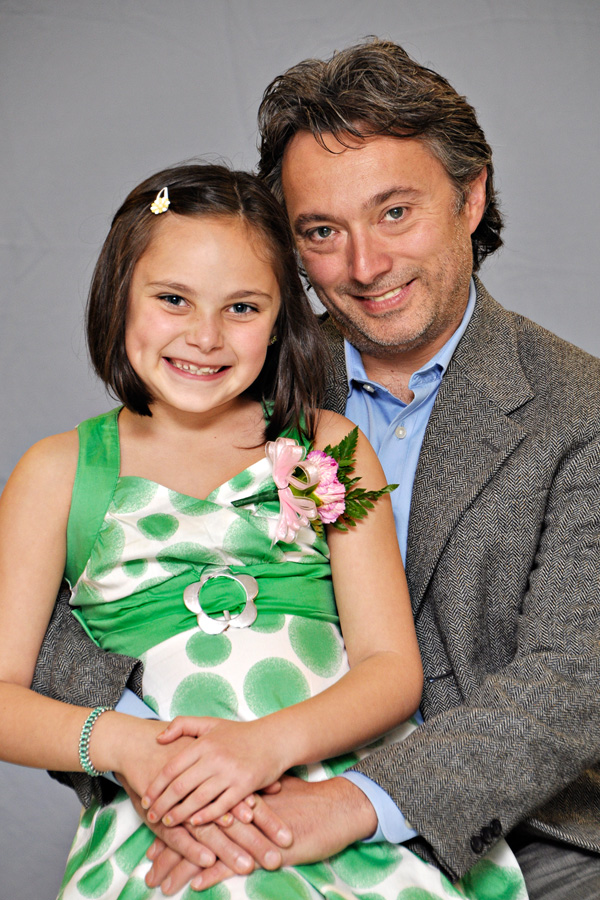
I volunteered to take portraits for the Brownies Father Daughter Dance. Turned out to be 53 girls and their dads! Whew. So Angela volunteered as a second camera. We set-up a make-shift studio in the school hallway by tacking up a sheet and using just one on-camera flash. Not like a pro studio, for sure, but hey, this is the equipment most of us own. So with the father sitting in a chair, and his daughter sitting on one of his legs with her legs in the middle, we asked the dad to put his hands in his daughter’s lap and the girl to put her hands on dad’s. We asked them to put their heads together so there was no space in between. Lastly, we tried to make sure that his cheek was somewhere near her temple. This way, their heads were staggered, a key to good group portraits. You never want to have everyone lined up evenly as it makes for a boring picture. There were several cases where dad came with two daughters, so when adding in the third, fourth or fifth person, ask some stand behind or on the side of dad, as this will ensure all of their eyes are on different level s. And be sure to have all of them close the gaps and move in closer to dad to keep the subject area in the middle. Another trick: since we opened up the aperture all of the way to be sure to blur the background, make sure that no one leans too far forward or too far back as then one of them will not be in sharp focus. Then we stood far enough back (approx 8 feet) to make sure we did not get the floor in the photo and we zoomed in to fill the frame. The flash was bounced off the ceiling. I positioned the flash almost straight up and this eliminated shadows on the backdrop. However, the loss of light from traveling up to the ceiling back down to the subject made the photo appear under exposed, so we just moved the exposure compensation to +2 and the image looked great. Last tip? Iron the sheet! Overall, the portraits came out very nice and everyone seemed pleased. (Tamron 18-270mm VC with VC on, Nikon SB800 bounced flash, ISO 400, F5.6, 1/60th sec, +2 exposure compensation, Auto White Balance).

Communion Portrait

COMMUNION PORTRAIT

I love window light. In the Italian restaurant where we celebrated this boy’s first holy communion, a bank of windows with translucent shades was near the kids table. I asked him to take a minute and stand near the windows, using the wall treatments as a colorful and classic background that leads your eyes right to the subject’s face. I set the camera to aperture priority and dialed in the widest aperture opening I could (F/4.2). The ISO was set at 400. And since the light was low, I turned on the anti-stabilizer on the lens and was able to get a sharp image at 1/30th of a second (gotta love that VC!). The natural light really lets you see the details in his dapper suit and his beautiful rose corsage. And his dark eyes sparkle from the window light. It took more than a few shots to get a natural smile, and I did it by asking him to close his eyes real tight and then open them. He giggled after making a goofy face and I was able to catch a pretty natural smile.

Scene Modes? They Really Do Work!

night portrait scene mode

I really feel like I cheated to make this picture on our trip to Mexico last week! I used the “night portrait scene mode” instead of bracketing exposures and playing with the flash to get just the right balance of exposure on her while still having a nice sunset in the background. I had literally a few fleeting seconds of her attention before the sun set below the horizon. So I put the camera on a scene mode, which I never do! And guess what? I got one of the best sunset pictures of the trip!