What I Learned Taking Basketball Photos

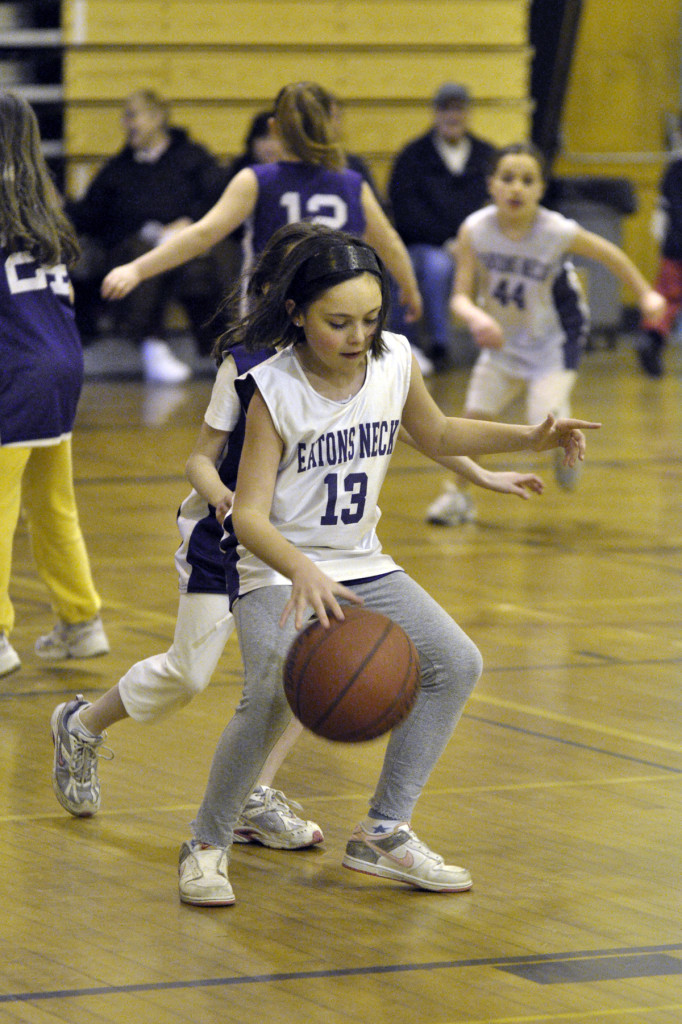
_DSC6403_RTIt’s hard. It’s really hard to get a good shot. That’s what I learned. Today I took photos at the basketball game again. I brought along the “big gun” – a 70-200mm F/2.8 lens. And I really assumed this would take care of all of the issues I had previously trying to get a good shot. And it did help quite a bit. But there are several issues you’ll be faced with if you plan to take photos in a gym. The biggest issue is lighting. The lighting in gyms can vary greatly. A gym with windows is much easier to shoot in since the brighter light is not only more natural for color, but it allows you to shoot at higher shutter speeds to stop action. In my case, there were no windows and only dull mercury vapor lights to shoot under. So not only was the lighting so low that I could not stop action effectively with my slower F/6.3 lens, but the color cast I got while using auto WB was unacceptable. So taking the following steps really helped me to finally get a better shot (but I am no Walter Iooss):

  1. Use a fast lens if you can. I used an F/2.8 lens that lets in lots of light
  2. Set your camera to aperture-priority and open the lens to the widest opening your lens allows since this will make the camera default to the highest shutter speed it can to stop action.
  3. Boost your ISO to 1600 or higher. Make sure you are able to get a shutter speed of at least 1/250th of a second to stop the action. If the camera is shooting slower, you will need to boost your ISO some more.
  4. Search thru your menus and see if you can find a setting to turn on “High ISO Noise Reduction” and set it to high. This will help reduce some of the noise you get when using an ISO over 800.
  5. Use manual white balance to get the best color that you can. See this post for information on how to set a manual white balance. And see the download card here for information about white balance in general.
  6. Position yourself near your team’s basket if you can so that you can get facial expressions when they have opportunity to shoot. Shooting under the basket does require a wider angle lens. Shooting from across the court calls for a telephoto lens.
  7. Shoot vertically as most action is vertical rather than horizontal. This will allow you to get full length shots, get the ball while in the air, and get players and the net in the shot.
  8. Watch your framing. I found I cut off the feet of my players quite often as I was concentrating on the ball so hard. Footless platers are sort of disturbing.
  9. Look for side line action like coaches giving their players direction, player interaction after a score, and details like the ball, the scoreboard, etc.

I hope these tips will help your sports shooting. And of course, practice and knowing the game go without saying.

Fine-Tuning the Color Cast in Your Photos: Custom White Balance

sidebyside_WB

One of the great advantages of digital photography is the ability to fine-tune the color of your photos pretty easily. There are many ways to do this including after the fact using photo editing software, adjusting custom image settings (like portrait, landscape, etc) though menus on your camera, and even the old fashioned way: using a filter. Filters were commonly used to remove the color cast of certain lighting when using daylight balanced film, or vice versa. Today, however, you can easily fine-tune the color by experimenting with your white balance settings. First, I suggest you review this white balance download card. Second, locate the white balance button on your camera (the button is usually designated by WB and is found on either the back or top right of your camera). If you hold this button down and use your scroll wheel, you will be able to move through the various white balance settings (consult your camera manual if your camera does not operate this way). Most often, AWB (automatic white balance) does a fine job of adjusting the color cast of the lighting to make sure white looks white and black looks black. However, sometimes the photo may  look too orange (or blue, magenta or green) for your taste. To fine-tune, you can select one of the pre-set modes. Just decide what type of light is hitting your subject and set the WB to the corresponding icon (see the download card again).

If you still find the color to not be what you are looking for, then it may be time to experiment with CUSTOM WHITE BALANCE. I will admit, I have not done much with custom white balance as I feared it was too difficult and only for real professionals. However, I have discovered it is really easy to set a custom white balance and the difference in color can be night and day. I used a custom white balance this holiday season in a relative’s living room that has consistently given me an issue the past few years, even when using a flash. This year’s holiday photos were much more pleasing as a result.

To set a custom white balance, follow these easy steps:
1) Hold down your WB button and scroll to PRE or Custom
2) Hold down the WB button until PRE or Custom blinks
3) Point your camera at a white piece of paper that is close to your subject or hold an “expodisc” (my tool) over your lens and point it towards the light source
4) Press the shutter release button as if you were taking a photo and look at the LCD on your camera to confirm the camera states “Good” (If not, try steps 3-5 again). No photo will actually be taken.
5) Take pictures
Note: if you use an expodisc, put your camera in manual focus to take the WB shot and then put it back into autofocus before taking photos.

The samples above of “Marabelle” show a distinct change in color cast. The AWB gave me an orange cast from the tungsten lighting in the room. The preset tungsten white balance setting gave me the same result. But by following the steps above, I was able to get a more accurate color rendition of Marabelle, her clothing and the surroundings. For example, look closely at the white zipper in each photo and the black marble counter top. Places where custom white balance can make a huge difference include stage lighting and gym lighting (look for a future post on this regarding the atrocious mercury vapor lighting in the gym where we play basketball) where the camera’s presets may have a hard time perfecting the white balance. So, if you are up to experimenting with this technique, I highly recommend it as yet another way to improve your photos and even save some time editing them later on. If you find yourself using a custom white balance often, then take a look at ExpoDisc or other products like it to make the job easier.

Free Photo Tips Card Download 2: White Balance

Download the second set of photo tips cards on White Balance and add them to the first set about Aperture. I hope you find this set useful as you shoot. Experiment with your white balance outdoors to warm up or cool a shot. Click here to download.