Take a Portrait With Shallow Depth of Field

earring_F6_150

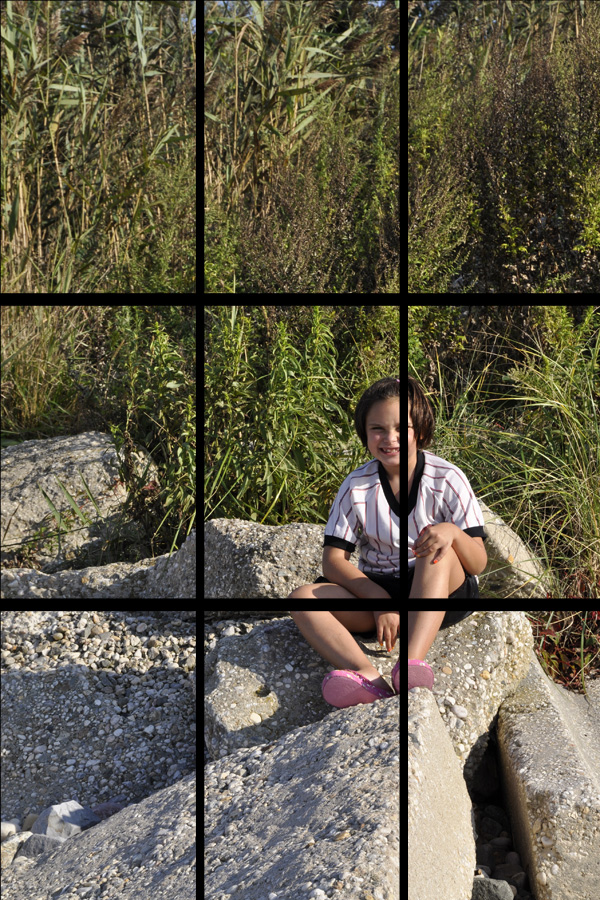
This is a repeat, but one that needs repeating since I think we all want to achieve great portrait shots— even when it’s just a quick candid shot we’re grabbing before the cake is served or before the kids are leaving for school. And using shallow depth of field is a key to great portraits (along with expression, lighting, angle). Shallow depth of field, when the parts of the image in front of and behind the subject are out of focus, makes your subject pop off the image. The example here (a repost from the summer), for instance, shows the eye and smile in sharp focus, yet the tip of the nose, ear and hair are out of focus. Another advantage of shallow depth of field is that you can eliminate distracting backgrounds like indoor clutter, foliage, cars on the street, etc., It makes the background less defined with soft colors.

To get shallow depth of field, the key is to set your camera to the “A” mode: Aperture-Priority. You can leave your ISO setting at 200 or 400 (or higher if the lighting conditions are low) and leave your camera in autofocus. You will then use your thumb-wheel to dial in the smallest number you can, like F/2.8, F/3.5, F/5.6. Focus on the eyes of your subject, or the eye that is closest to the camera. Depending on how close you are to your subject and what lens you are using (telephoto lenses and closer proximity make the effect even more apparent), you will notice that the background is just soft to almost unrecognizable. If you want the photo to have some context of where you are (like cooking in the kitchen), then maybe F/5.6 is a better choice. But if you want the crowd in the background to go really soft, “open the lens wider” to F/3.5 or F/2.8 if you can.Please review the aperture download card here.

Take a Photo that Demonstrates the Rule of Thirds

_DSC4304_RT_150

The rule of thirds is one of the most powerful creative options you have when composing your photograph. A photo that has the important element of the photo at an intersecting point of a “tic tac toe” board, or in one of the right or left, top or bottom thirds of the photo, is one that is more compelling  than a shot with the subject centered.

_DSC4304_RT_150_wgridMost often, you don’t want to position your subject smack dab in the center of the frame. It’s boring. Although, this rule, like all rules, can be broken very effectively. That really depends on the shot. But if you start to think about not putting you subject in the center of the frame, you will train your eye to see better shots. For example, the eye closest to the camera should hit one of the intersecting points. Or the critical part of the landscape should be in the top third or bottom third, left third or right third. My shot here shows the subject off to the right slightly and in the lower portion of the frame. This gives the subject breathing room in the frame, the “white space” (which does not have to be white, but rather unimportant or non-distracting space in the frame) gives your eye a place to rest and then come back to the subject, and by positioning the subject as I did, you get a feeling of where she is and that where she is important to me and therefore should be to the viewer as well. Below is another example. This time a vertical landscape that also adheres to the rule of thirds. I added the tic tac toe board to both images also so that you can get a better idea of where the intersecting points or thirds of a frame are.
_DSC4279_RT_150 _DSC4279_RT_150_wgrid

Window Light Portraits

DSC_0628_RT4x6jpg

A few things to keep in mind when taking a portrait of a person or pet by window light:

ONE: Natural window light usually means wide open apertures and slower shutter speeds, so consider boosting your ISO if necessary, be sure your anti-shake mode is on, or use a tripod to prevent camera shake.

TWO: The closer you are to a window, the more dramatic the shadow on the opposite side of the face will be. Positioning your subject further from a window means softer, more even light.

THREE: You can actually stand in front of the window and position your subject facing the window and it won’t cast a shadow! This results in very flat lighting on the face. Four, shoot by a window even if it is overcast or there are soft sheer curtains. The light will be beautiful.