Capture Silky Smooth Moving Water

Water is a compelling photographic subject. And how you capture it makes an impression on the viewer. Freezing the action for crystal clear water droplets from a crashing wave or pool splashes conveys power and energy. Slowing the motion down to create a milky white stream of water creates a more serene picture.

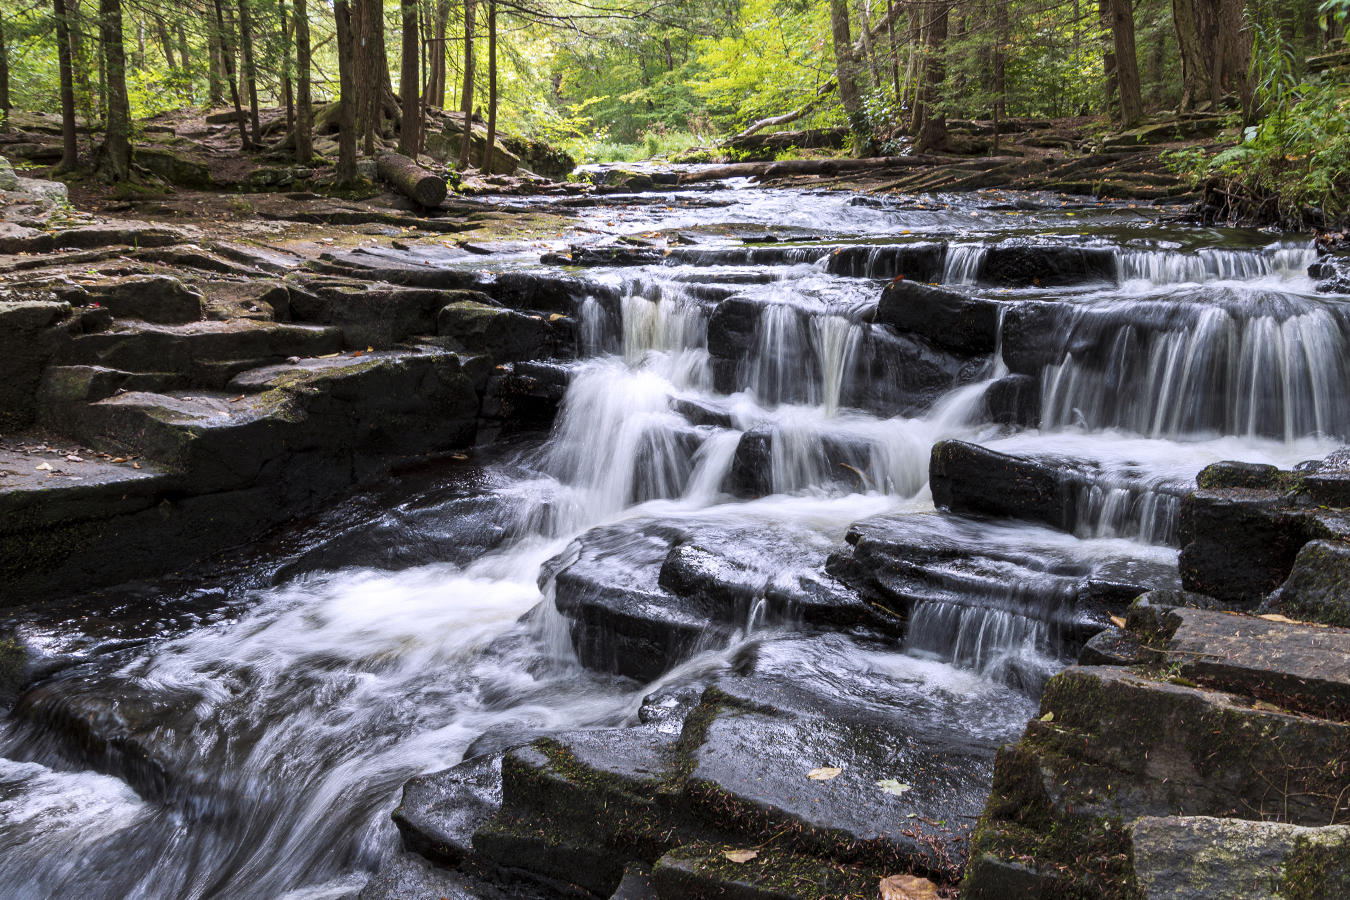
In this photo taken on the Little Falls Trail in Promised Land State Park, Poconos, PA, I hiked in mid-morning with my 18-400mm all-in-one lens as well as an electronics cable release designed for your camera and my travel tripod, two must-have accessories to create silky water fall action. Getting as close down and into the flowing water as possible creates a more dramatic perspective.

Settings are very important. First, set your camera to aperture priority and choose an aperture that will give you deep depth of field (between F11-F22 is ideal) so that your foreground to background will be in focus. I used F11 here. Next, select ISO 100. Now look thru the viewfinder and see if your shutter speed is below 1/15th second (I shot my image above at 1/6th second). You can change your aperture to make the shutter speed faster or slower. If you move the aperture from F11 to F16, the shutter speed be slower. If you open up your aperture to F8 to let light more light in, the shutter speed will be faster. Start shooting to see your effect and change your aperture until the image looks the way you want it to.

Since you will be shooting at slow shutter speeds below 1/60th second, you will not be able to handhold the camera. You must use a sturdy tripod and a cable release to ensure there is no camera shake.

The three settings involved in creating an image of a waterfall are referred to as the exposure triangle. The ISO, the aperture and the shutter speed all work in concert to create the effect. So your constant will be your ISO. The second that you will work with is your aperture. Opening or closing the aperture will change the shutter speed to be faster or slower. The shutter speed is ultimately the setting that will either freeze the water (faster shutter speed) or create the silky effect (slower shutter speed).

And the last tip for any landscape photo is to focus about a third of the way into the scene. This will give you the best results for foreground to background focus.

This tip is a good self-assignment for any season. So, find a park with waterfalls within driving distance and head out with your wide-angle lens, tripod and cable release.

Isolate Details for a Different Look at Landscapes

Nikko

When you say “landscape” I’m sure the vision you have in your mind is a panorama of a sprawling field, distant mountains or grand canyons taken with a super wide angle setting on your zoom lens. However, telephoto zoom settings can also be used effectively for landscape photos. When you zoom in on the details of your landscape, you can bring out something special. Here, in Nikko, Japan, I captured the majesty of the not-quite peaked fall season by isolating a few brilliantly colored trees clustered together in the still mostly green landscape. The resulting picture says “fall” unlike the wide angle shot I could have taken. Next time you’re shooting landscapes, zoom in and see what interesting detail you can find: a single tree, a mountain peak, a reflection in the lake, and more. When you use the telephoto setting, you compress the distance between objects and achieve a flat, almost painterly 2-D effect.

Take a Photo that Demonstrates the Rule of Thirds

_DSC4304_RT_150

The rule of thirds is one of the most powerful creative options you have when composing your photograph. A photo that has the important element of the photo at an intersecting point of a “tic tac toe” board, or in one of the right or left, top or bottom thirds of the photo, is one that is more compelling  than a shot with the subject centered.

_DSC4304_RT_150_wgridMost often, you don’t want to position your subject smack dab in the center of the frame. It’s boring. Although, this rule, like all rules, can be broken very effectively. That really depends on the shot. But if you start to think about not putting you subject in the center of the frame, you will train your eye to see better shots. For example, the eye closest to the camera should hit one of the intersecting points. Or the critical part of the landscape should be in the top third or bottom third, left third or right third. My shot here shows the subject off to the right slightly and in the lower portion of the frame. This gives the subject breathing room in the frame, the “white space” (which does not have to be white, but rather unimportant or non-distracting space in the frame) gives your eye a place to rest and then come back to the subject, and by positioning the subject as I did, you get a feeling of where she is and that where she is important to me and therefore should be to the viewer as well. Below is another example. This time a vertical landscape that also adheres to the rule of thirds. I added the tic tac toe board to both images also so that you can get a better idea of where the intersecting points or thirds of a frame are.
_DSC4279_RT_150 _DSC4279_RT_150_wgrid

Photographing the Windmills in LaMancha

DSC_2812

I travel a lot for work and get to sightsee for one day on many of these trips. While I am sometimes sad I am seeing the world without my family (I’ve created a scrapbook page called My Travels Without You), I am grateful for the chance to experience other cultures, food, history and more. Last year I went to Madrid. It’s a year already! I leave for this year’s trip to Malta next week. We visited the sight were Don Quixote “battled” windmills. This shot was one of many from different angles as we walked around the property. It’s one of the few that did not have other tourists in the background, a frequent issue when shooting on vacation. The best tip for that problem is patience! But I post this one for three reasons:

1) I am sure you are sick of seeing so many photos of my built-in model;

2) It’s a good example of the rule of thirds;

3) It’s also an example of leading lines. When taking photos, imagine that there is a tic tac toe board on your screen. Put the main interest of your subject (like eyes, or head, or Disney Castle) at one of the intersecting points, or in the upper or lower third, or the right or left third. This makes a more exciting photo than when the subject is smack in the middle. So always try to offset in some way. But remember, rules are made to be broken and sometimes the middle is the best way for a particular shot, especially if you are trying to create exact symmetry in your image. In this shot, the horizon and the windmills are positioned from middle to the upper third of the image. And the road is a good example of a leading line that guides your eye right to the first windmill and then the windmills themselves guide you right through the rest of the shot.

Look for shots from Malta next week.