Quick Silhouette

Exp Comp(-2.0)_SAE_3640There are several ways to capture silhouettes. I find one of the easiest is to use your exposure compensation function, the same feature discussed in the previous post. The image above was shot at -2.0, under-exposing the image by two stops. The sky is a rich color, and the couple on the beach swing is completely black. Below, you will see variations of compensation (0, -1.0 -2.0 and -3.0) of the same scene. Next time you’re shooting around sunset, take several images of your subject that has strong identifiable lines at different exposure compensation settings until you find the one that best suits your vision.

Exp Comp(0)_SAE_3637

Exposure Compensation 0

Exp Comp(-1.0)_SAE_3639

Exposure Compensation -1.0

Exp Comp(-2.0)_SAE_3640

Exposure Compensation -2.0

Exposure Compensation -3.0

Exposure Compensation -3.0


Add a Little Light to Combat Harsh Sun for Better Beach Photos

FillFlashMainPhoto

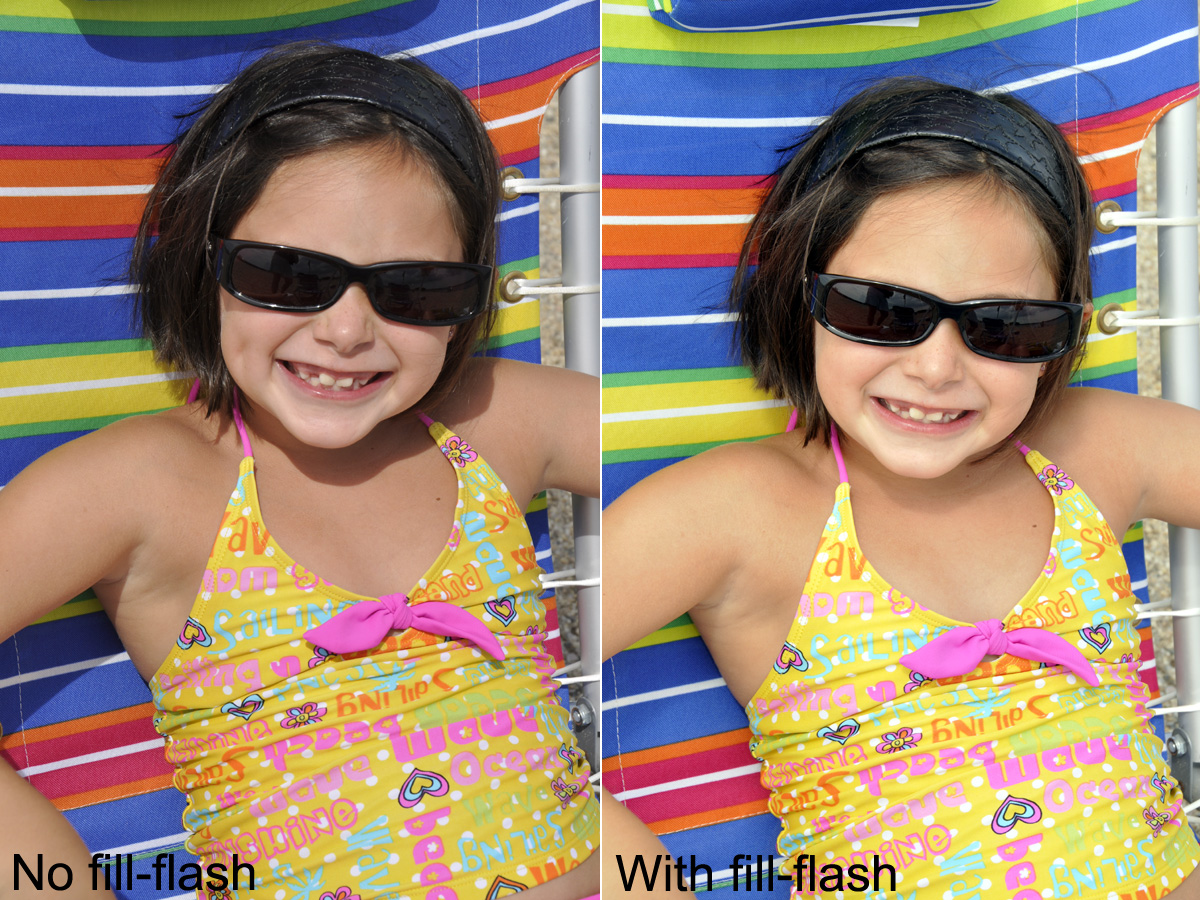
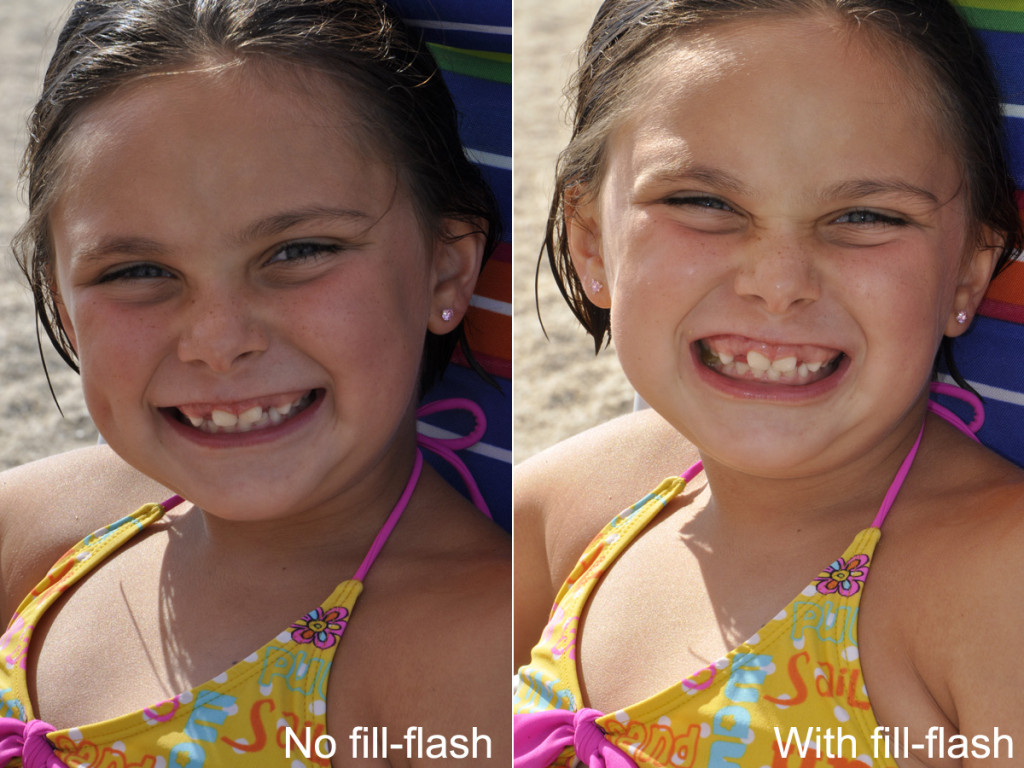
Taking pictures at the beach is always fun (as long as you take a few precautions to protect your camera — see 7/6/11 post). But often we get harsh shadows that make the photos less desirable. Get rid of the harshness and raccoon eyes just by popping up your flash! Put your camera on the program mode (P) and pop-up your flash. As you can see in the example comparisons below, you can soften all of the harsh shadows. Examine the two photos. Look under the chair’s head rest, under the left arm, under the chin and below the rim of the sunglasses. Additionally, look at the sliver of rocky sand in the background on the right side. On the left, it’s sort of greyish, but on the right, it is a more pleasing color. Then look at the example further below (please ignore that toothless grinny expression!). In this case, the brightness behind the subject made the camera’s meter stop down a little (like putting on sunglasses because it was too bright) resulting in her face being too dark. But by popping up the flash, you see how you can brighten up a dark face. Tip: If you find the flash to be too bright or too artificial looking for your taste, then  you can tone down the flash very simply. Look at the same button you use to pop up your flash. It should have a +/- symbol. Hold this button in and dial the wheel at your index finger to the right so that the numbers on your display go to the negative side. You are essentially subtracting power from the flash so that it puts out less light. Try several different settings (-0.7, -1.0, etc) until you achieve a desirable shot. You may need to consult your owner’s manual (yes, sorry) and look for “flash exposure compensation” in the index.

comparison_2_fill flash comparison_1_fill flash

Grab Your Camera and a Towel and Head to the Beach for Fun Photos

_DSC2558_RT

It’s finally summer! And if your family’s like mine, beach figures heavily into the weekend. If you have young children that love to explore the beach, then get down on the sand with them. Make sure to bring a towel so that you can easily sit or even lay down close by in order to capture their explorations (and to keep sand on your hands to a minimum). Getting close and using a wide angle setting on your lens lets you show some more background to give a point of reference (see photos below). On bright sunny days, trying popping up your flash for some fill to eliminate harsh shadows from midday sun, and to add some light to your child’s face often hidden by cute sun hats. But don’t let cloudy days like we had here stop you form heading to the beach with your camera. The over cast sky is actually perfect for picture-taking. One note of caution: Salt water is an enemy of you camera. If the conditions are very “moist” on a hot hazy beach day, salt residue and water can collect on your camera and lens pretty quickly. Try putting your camera in a zip lock bag with a hole cut out for the front of the lens to stick out and be sure to use a UV filter. Clean the lens as soon as you can with lens cleaning fluid and a micro fiber cloth taking extra care to inspect for and remove any sand that may be on your lens before rubbing the lens. Then wash the cloth before using again after the beach. Store the camera back in your camera bag right after use to keep it out of the sun and elements. There are also special bags made for your camera to prevent any damage. Google rain coats for cameras.

_DSC2583_RT

_DSC2577_RT

"My Photo Are Too Dark" — Solutions for Common Problems: Part 2

_DSC8231_RT

In my last post (so long ago, I apologize but summer seemed to have gotten in the way), I covered easy solutions for blurry photos. The next most common problem is dark photos (i.e., under-exposed). While the most logical answer is there just is not enough light, there are other reasons for dark photos.

Problem: You are using the flash but the subject is still dark. Reason: The subject is too far away. The built-in flash on your camera can safely cover a distance of about 10 feet or so. If your subject is well beyond that, chances are it cannot be lit by your flash. Solution: The answer in this case would be to move a little closer. (You can also try raising your ISO to give your flash some more distance coverage).

Problem: The background is really bright and the camera’s meter is fooled. This is called a “back-lit” situation. The meters in today’s cameras are excellent, and you have the choice of several metering patterns to help you achieve your desired result. However, there are still situations like back-lit where you camera’s meter is fooled and gives you the wrong exposure for your subject. When the background is overly bright, the camera “puts on a pair of sunglasses” by closing the aperture down a little to let in less light, resulting in a nicely exposed background and a darker subject.

Examples of back lit situations:

  • in front of a picture window
  • at the beach or pool
  • on snow
  • when shooting from below up against a bright sky, etc.
  • under an overhang (like a stadium with field in the background)
  • The sun is behind your subject

Solution: 1 My favorite option is to use the + exposure compensation (covered here and here). This +/- button usually positioned near your thumb is one of my often used adjustments since you can quickly darken or lighten a subject. By adding (+) .3 to 1 full stop of light by dialing towards the plus side (see your instruction manual to see just how your camera works), you can trick your camera into removing the sunglasses and get a perfect exposure on your subject. By bracketing (taking several shots at several different exposure compensation settings) you are sure to get the proper exposure.

Solution 2: A second solution is to pop up the flash and fill in the subject.

Solution 3: Another way to get a good exposure in a precise area is to switch the camera’s metering pattern to spot metering. Most of the time, you are most likely shooting in the camera’s matrix mode that reads several areas of the image and gives you an exposure based on a lot of data built into the camera. This pattern works well much of the time. But the camera also has a center metering pattern where a smaller area is read and the exposure is based on that area. And even smaller sliver of the image can be measured by suing the spot metering mode (the rectangle with a small dot in the middle is the symbol for this pattern). Make sure the dot lays over the area of your subject you want properly exposed and then take the shot. If you need to recompose your image after taking the reading (dot on subject), then hold in the AE lock button located near the +/- button until you have finished taking the photo. Breaking out your camera’s instruction manual will give you the exact steps to set spot metering and to use AE lock.

In my example above (a perfect shot to end the summer), the child’s face my have been under-exposed, or dark, due to the brightness of the sky, surf and sand. But by adding 2/3-stop of light using the +/- feature, I was able to get a great exposure on her cute face.

Don’t Let Bright Sun Ruin a Candid Portrait- Move into the Open Shade

Open_shade_sun_comparison
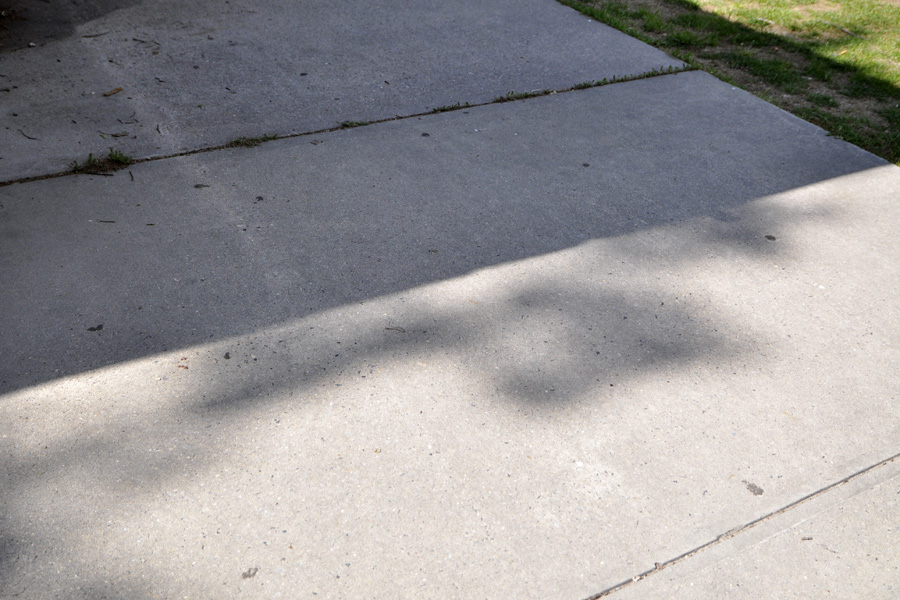
We are not nocturnal by nature, so our photo-taking time is usually during the day. And now that it is almost summer, there will be plenty of bright sunny days on which you want to take photos of vacationing kids and visiting guests. So what do we need to do to get a decent outdoor portrait? The simplest solution is to look for open shade. Open shade is the step you take back from the sunny to the shady. It can be just under a tree. Or a step inside a door frame or porch. Or a tent or any overhang. The open shade eliminates all of the contrasty shadows that appear on the face and clothing of a subject standing in the sun. Look at the side by side comparison, especially the eyes and the shirt of the girl on the left. (Pls ignore the color as I did not reset my white balance from sunny to shade and consequently have some funky color going on; pls be sure to set the WB to auto or shady). Below is a shot that shows you the line between a good and poor candid portrait. The girls were first on the sunny side of the line, and then took a step back into the shade. I love how the light catches in their eyes when you shoot in open shade. For more on open shade, see this post too.
shadow line

Change Your Position for Better Photos

shoot from above
Just like changing the scenery can give us a whole new outlook and change our mood, so does changing your position when taking a photo. It is very common for all of us to just shoot pictures from a standing position, but this leads to somewhat boring images. We have all gotten a much better shot just by crouching down or standing on a chair or bench. Not only do you get a whole new perspective, but this helps to eliminate distracting backgrounds for a clean, more professional look. For this shot, I was standing on the bulkhead while my subjects were down on the shore, allowing me to give a real sense of where they are since I was able to show both the sand and the beach grass in the shot. Plus, the busy background harbor was now out of the shot. Look for the next photo tips card download about positioning yourself for better photos to come shortly (see previous photo tips cards: #1 here; and #2 here).

Use Your Flash for Outdoor Photos

fill flash_blog post

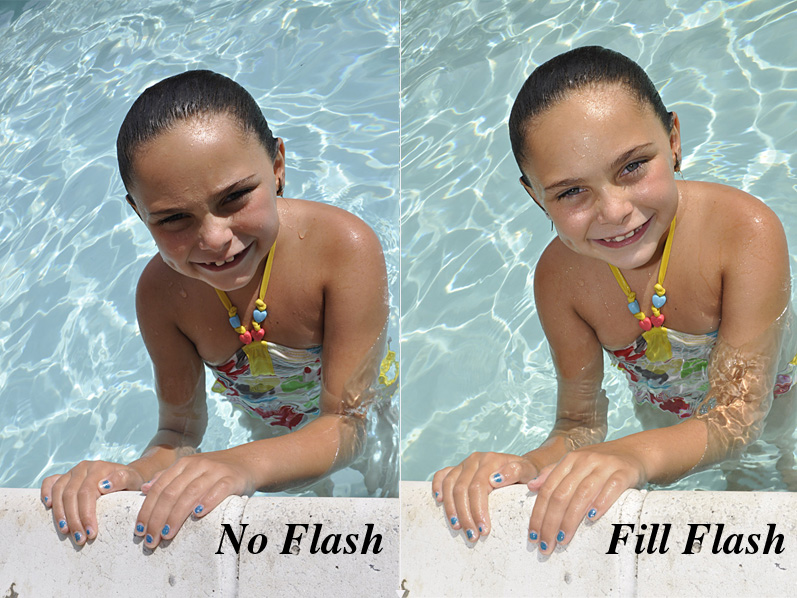
We all have heard the rule that early morning and late afternoon are the magical times for talking photos. But let’s face it. At noon, we’re at the pool or the beach. Noon is when the action is happening and when we are more likely to be taking photos. So in order to avoid the raccoon eyes that come with overhead noon time light, just turn on your flash! The small burst of light will fill in shadows and make your subject’s eyes pop out just like it did for my subject. Look at the shot on the left with no flash. Harsh shadows fill in the eye sockets and the shadow is strong across her shoulder and neck. For the shot on the right, I just popped up my built-in flash and it makes a world of difference. To avoide over-exposing your subject, one trick is to dial in a small aperture like F/16 or F/22. For some people, images that use fill flash may appear to be too artificial. If you find the flash puts out too much light, there is a setting on most DSLR cameras whereby you can “compensate” the flash in a plus (+) or minus (-) direction. Dial in a -1 or -2 flash compensation and the flash will emit less light to fill in shadows more subtly. (For that tip, however, you will have to break out your camera manual to find the setting). So next time you’re at the pool or beach this summer, and you cannot get your subject under an umbrella, or tree or some other type of open shade during those harsh hours between 11am and 3pm, then try popping up your flash! (25mm; F/16; ISO200)