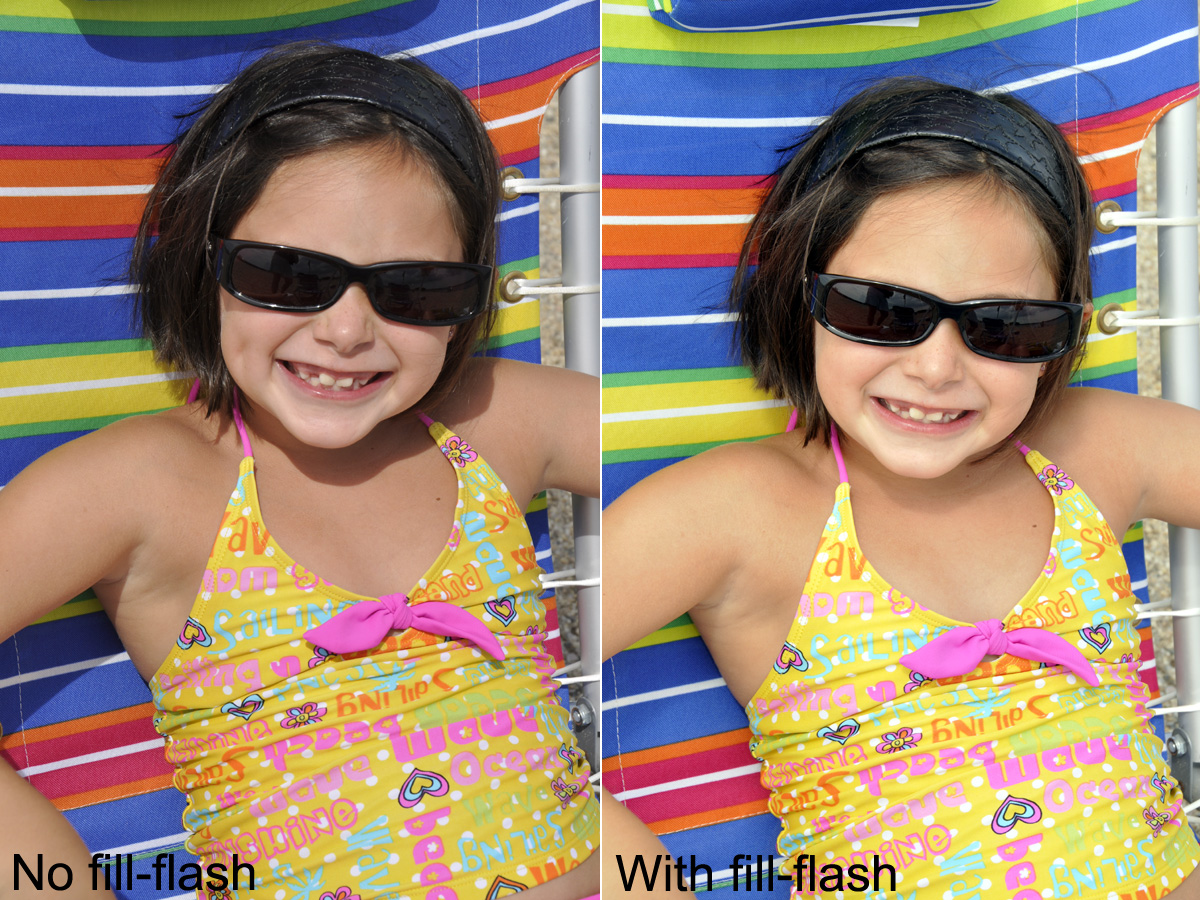
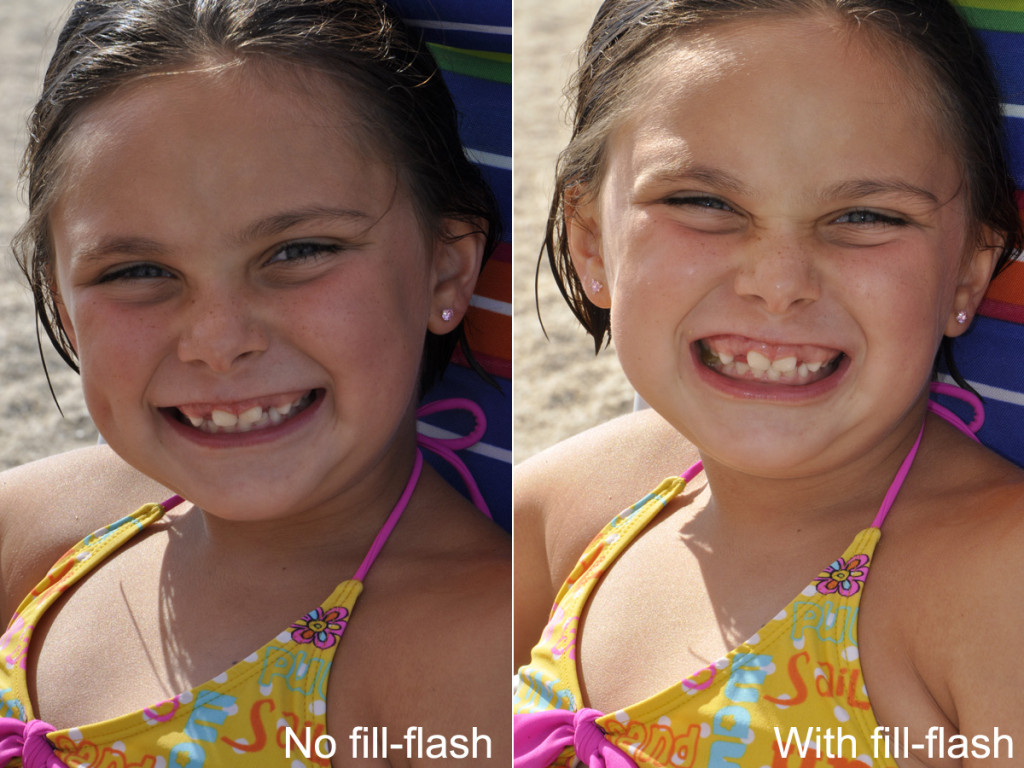
In my last post (so long ago, I apologize but summer seemed to have gotten in the way), I covered easy solutions for blurry photos. The next most common problem is dark photos (i.e., under-exposed). While the most logical answer is there just is not enough light, there are other reasons for dark photos.
Problem: You are using the flash but the subject is still dark. Reason: The subject is too far away. The built-in flash on your camera can safely cover a distance of about 10 feet or so. If your subject is well beyond that, chances are it cannot be lit by your flash. Solution: The answer in this case would be to move a little closer. (You can also try raising your ISO to give your flash some more distance coverage).
Problem: The background is really bright and the camera’s meter is fooled. This is called a “back-lit” situation. The meters in today’s cameras are excellent, and you have the choice of several metering patterns to help you achieve your desired result. However, there are still situations like back-lit where you camera’s meter is fooled and gives you the wrong exposure for your subject. When the background is overly bright, the camera “puts on a pair of sunglasses” by closing the aperture down a little to let in less light, resulting in a nicely exposed background and a darker subject.
Examples of back lit situations:
- in front of a picture window
- at the beach or pool
- on snow
- when shooting from below up against a bright sky, etc.
- under an overhang (like a stadium with field in the background)
- The sun is behind your subject
Solution: 1 My favorite option is to use the + exposure compensation (covered here and here). This +/- button usually positioned near your thumb is one of my often used adjustments since you can quickly darken or lighten a subject. By adding (+) .3 to 1 full stop of light by dialing towards the plus side (see your instruction manual to see just how your camera works), you can trick your camera into removing the sunglasses and get a perfect exposure on your subject. By bracketing (taking several shots at several different exposure compensation settings) you are sure to get the proper exposure.
Solution 2: A second solution is to pop up the flash and fill in the subject.
Solution 3: Another way to get a good exposure in a precise area is to switch the camera’s metering pattern to spot metering. Most of the time, you are most likely shooting in the camera’s matrix mode that reads several areas of the image and gives you an exposure based on a lot of data built into the camera. This pattern works well much of the time. But the camera also has a center metering pattern where a smaller area is read and the exposure is based on that area. And even smaller sliver of the image can be measured by suing the spot metering mode (the rectangle with a small dot in the middle is the symbol for this pattern). Make sure the dot lays over the area of your subject you want properly exposed and then take the shot. If you need to recompose your image after taking the reading (dot on subject), then hold in the AE lock button located near the +/- button until you have finished taking the photo. Breaking out your camera’s instruction manual will give you the exact steps to set spot metering and to use AE lock.
In my example above (a perfect shot to end the summer), the child’s face my have been under-exposed, or dark, due to the brightness of the sky, surf and sand. But by adding 2/3-stop of light using the +/- feature, I was able to get a great exposure on her cute face.
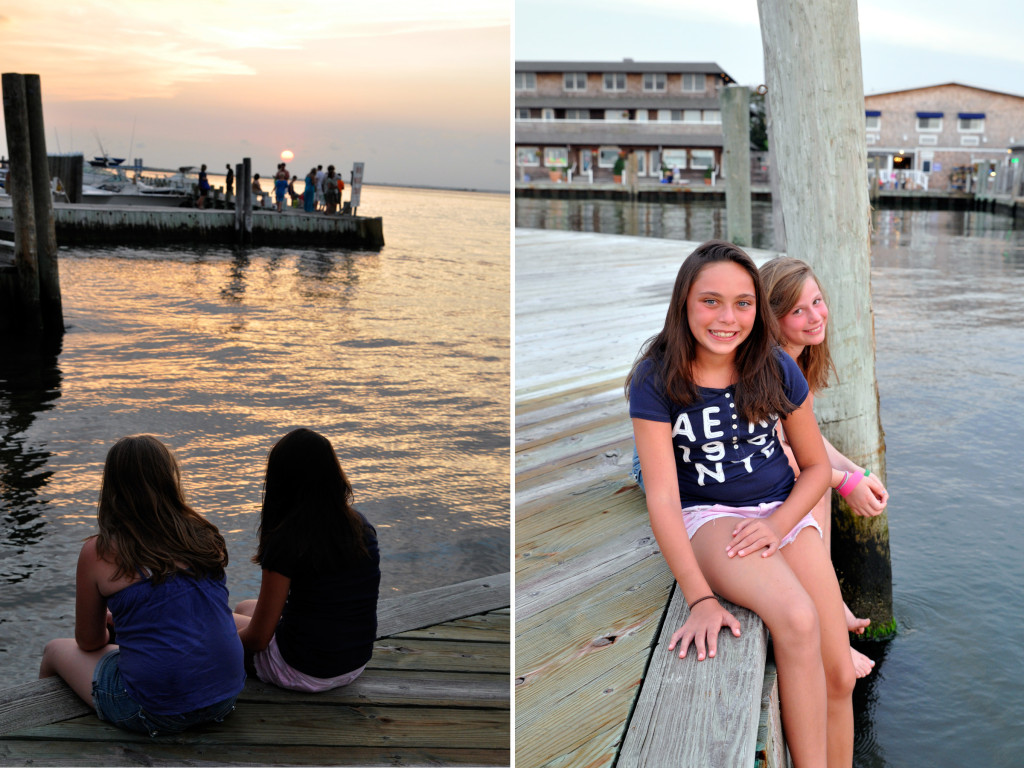 Sometimes we take the shot we had in mind and call it a day. But when the light is so beautiful at sunset, it pays to take a few steps around just to check out how the sun is lighting your subject. The photo on the left was the one I was after: two girls watching the sunset, captured in near silhouette as the center-weighted meter gave an exposure for the bright setting sun and made most of the other parts of the shot go dark. Just what I wanted. But then I sat down next to the girls to watch the sunset with them, and wow, was the light across their faces gorgeous. So of course I snapped away while the sun set! Because the light was low, I boosted my ISO to 640 and got a shutter speed of 1/100th sec at F/5.0 aperture. If I had unlimited cooperation from my two subjects, I would have boosted the ISO to 1000 and shot more photos at F/8 so that the girl further back would be in sharper focus. When shooting more than one person, either try to get them on the same plane of focus, or deepen your depth of field by using a smaller aperture like F/8. Not always possible, as was the case here, but the sweet expressions and the light make the shot a perfect one for me.
 Sometimes we take the shot we had in mind and call it a day. But when the light is so beautiful at sunset, it pays to take a few steps around just to check out how the sun is lighting your subject. The photo on the left was the one I was after: two girls watching the sunset, captured in near silhouette as the center-weighted meter gave an exposure for the bright setting sun and made most of the other parts of the shot go dark. Just what I wanted. But then I sat down next to the girls to watch the sunset with them, and wow, was the light across their faces gorgeous. So of course I snapped away while the sun set! Because the light was low, I boosted my ISO to 640 and got a shutter speed of 1/100th sec at F/5.0 aperture. If I had unlimited cooperation from my two subjects, I would have boosted the ISO to 1000 and shot more photos at F/8 so that the girl further back would be in sharper focus. When shooting more than one person, either try to get them on the same plane of focus, or deepen your depth of field by using a smaller aperture like F/8. Not always possible, as was the case here, but the sweet expressions and the light make the shot a perfect one for me.
