Holiday Portraits Using the Night Portrait Scene Mode

nite_portrait_flash
I rarely use the scene modes on my camera, but the one I find myself using from time to time is the Night Portrait mode. This scene mode is the one with the icon featuring a person and star  or moon (see typical camera mode dial below). I use this mode when I want a person as my main subject, but the special lighting in the background, like Christmas lights, Times Square lighting, or a sunset, is equally important. In this photo, my subject posed in front of the town’s decorated gazebo and lit tree.
night portrait mode on dial
The Night Portrait mode sends out a burst of the flash to capture the subject and than makes the shutter stay open a little longer to capture the lighting in the background. The trick in this mode is to be sure both you and your subject hold still to avoid unwanted blur from camera shake or subject movement. In fact, my subject did move and her hands are slightly blurry due to the very slow 1/10 sec shutter speed required to achieve the effect. But the expression was just what I hoped for, so for me, it’s perfect. I boosted the ISO considerably—to 1000— and I opened my aperture to F/5, the widest setting for this situation, in order to make the lights softer in the background. Using the Night Portrait mode helped me take the guess work out of deciding how to set my flash and shutter speed and instead concentrate on snapping away until I got what I was looking for. So pose your kids in front of the tree or outdoor decorations, or position your family along the railing at sunset on your next cruise, set the camera to Night Portrait mode and see what you can get!

Using Flash for Indoor Photography

aux flash

I have to admit it. Flash is my least favorite type of photography. I suppose since it seems so technical and the results can vary from situation to situation, looking artificial, too dark or too washed out. Luckily, today’s flashes can run pretty much on auto pilot and can be used for creative effect with just a little practice. But this time of year, and for the next four or five months, we’re all stuck indoors a great deal of the time, especially during the holiday season when we take so many candid photos at get-togethers. So I thought I’d share just a few basic flash tips to improve your indoor photos:

1) Your pop-up flash, the one that is part of the camera and pops up automatically if you are shooting in the “green box” total program mode, can cover just a short distance. Most of the time, any subject further than ten feet cannot get enough of the flash illumination for a properly exposed shot and that is why they look dark. You can boost your ISO to higher than normal (try 800 or 1000) to try and get more reach.

2) When you position your subject too close to a wall and use your pop-up flash, you are bound to get harsh shadows behind your subject. Eliminate this by having your subject step a few feet away from the wall and by shooting from a little bit above the subject (which is also a more flattering angle for portraits).

3) Your pop-up flash can cause red-eye quite often. This is because the flash is so close to the lens. It is worse on point-and-shoot cameras than DSLR cameras, but typical in either case. To eliminate red-eye, you can use the red-eye reduction function that throws out a pre-flash to make your subject’s eyes close down, but I find often that people think you’re done and move before the photo is actually shot. You can also try turning up the lights in the room to help the iris naturally close down a little.

4) If you are in a very dark room, the camera/flash may over-expose your subject (you know, the white face that appears to have nothing but eyes and lips) since the camera reads the room as very dark and wants to make it brighter. This also happens if you are too close to your subject. One solution is to back up to correct the latter, and turn up the room lights if you can for the former. If you cannot control the lighting, try moving your subject closer to a room light like I did above.

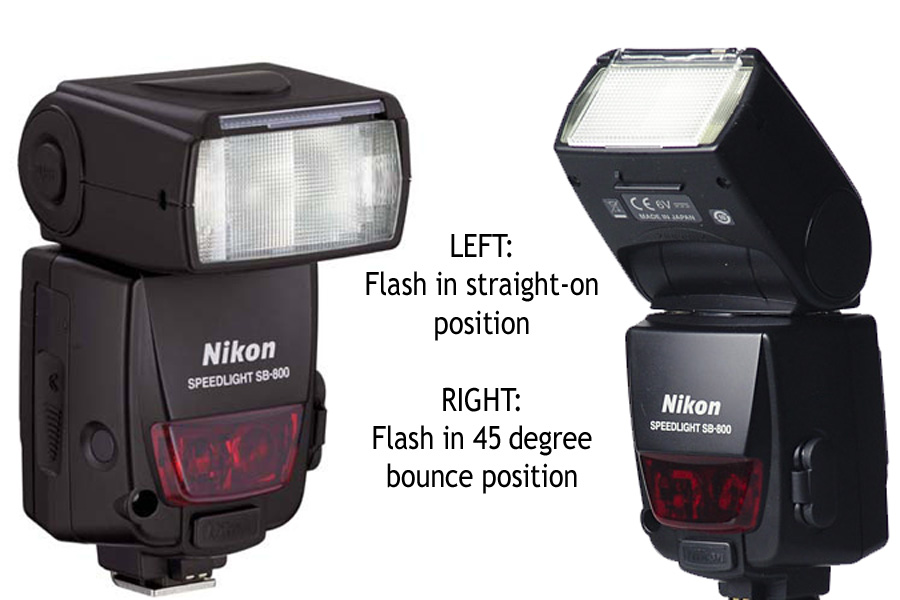
An on-camera auxiliary flash, like the one for my camera shown above, elevates the flash away from the lens and helps to reduce red-eye dramatically. This type of flash also helps in other ways: a) it can throw the flash further allowing you to be further away from your subject; and b) you can change the position of the flash to get more even lighting with much less shadows. This is called “bounce flash.”

{bounce flash}

{bounce flash}

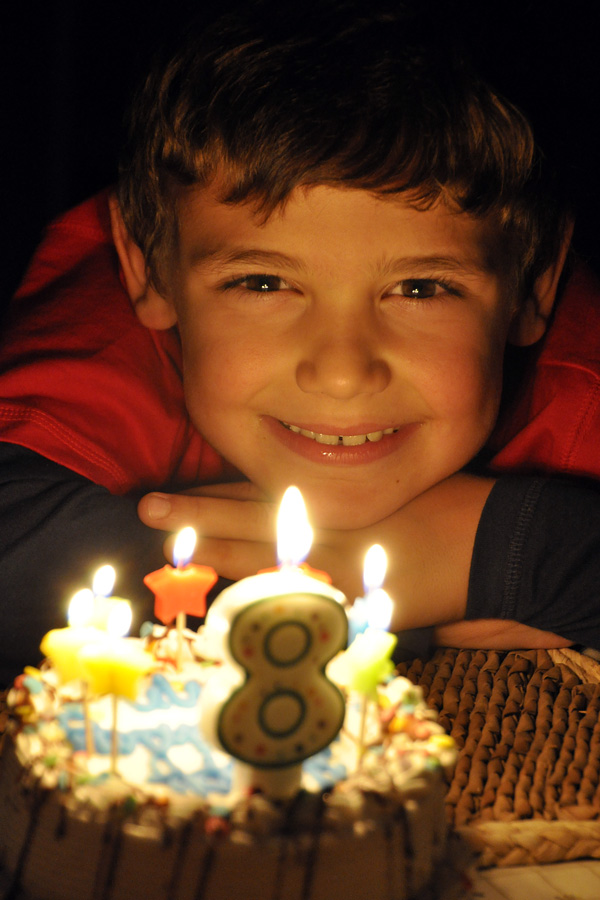
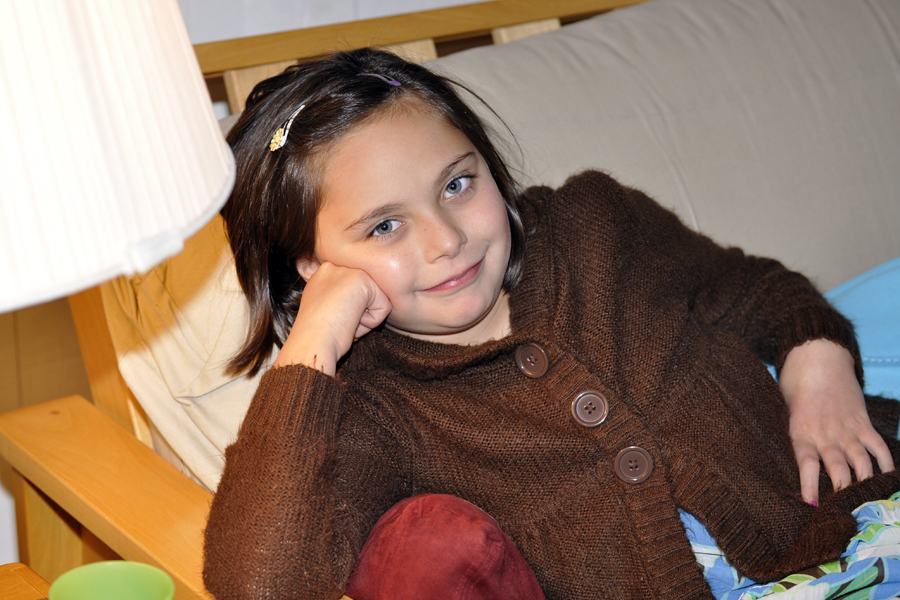
The photo above of my very Thanksgiving-weary subject was taken with the auxiliary flash in a bounce position. The flash bounced off of the ceiling and back down onto my subject. You can see the lighting looks much more natural and softer than in either of the two photos below where the shots look more artificial and harsh. In the photos below, you can also see the harsh shadow under the lamp and on the futon frame. And, there are hot spots on her cheeks. You can also see how quickly the flash “drops off,” meaning the couch gets darker, whereas in the photo above, the couch and subject are all evenly illuminated since the bounced flash showers the whole area with light. One caution–always bounce off of a white wall or ceiling as the flash will take on the color cast of what it is being bounced off of (e.g., a green ceiling will produce a ghoulish effect).

{pop-up flash on camera}

{pop-up flash on camera}

{straight-on auxiliary flash}

{straight-on auxiliary flash}


Like learning how to control your depth of field to blur backgrounds, mastering your flash is a must for anyone who is looking to take better people photos. So this season, try to remember some of the tips above when shooting your flash candids at family gatherings. And if you can get an auxiliary flash made for your camera onto your wish list, it will be a worthwhile investment for many years.

Photos by Candlelight

JohnBday

Taking a photo by candlelight can be a little tricky. But boosting your ISO and opening your aperture to its widest opening can really help. In this photo, I asked my subject to move his face close to the cake (but not so close as to get burned). My ISO was set to 1600 and my aperture at F/5.6. I held my camera as steady as possible and used the image stabilizer on my lens. I metered on his face and zoomed out a little to compose and focus. The result is a warm image from the candles, and a nice highlight in his eyes. Use a high ISO and position your subject close to candles for any birthday celebration, or for the lighting of the menorah this holiday season.

End of Summer Photo Lesson: Shooting in Open Shade

_DSC4032_RT

When the sun is really harsh, you can still get wonderful portraits by placing your subjects just inside a shady area. This might be just under an umbrella (like my example of these gorgeous siblings), inside a garage door, inside your house door, under the slide at the park, under the light of the first tree, etc. The key is to not position your subject too deep into the shade. You want all of the light that is just behind you to spill softly onto your subjects. This will give even lighting across the face(s) as well as great light in the eyes. (65mm -cropped; F/5.6; ISO 400).

BONUS Lesson: This second photo was also taken in the open shade of a small umbrella on a very bright beach. Here you can actually see just how close they are positioned to the edge of the shade. But I am throwing this in to illustrate leading lines. Your eye naturally goes to the boy first and follows down the line to the sitting girl, but notice how the lines of the table push your eye right back up again. This is a great way to keep your viewer engaged within the image.(55mm; F/5.6; ISO 400)_DSC4035_RT

Window Light: Use it to take close-up photos, too!

macro_blog

It’s important to capture possessions that are important to you and your family as it will be fun to look back on those photos years from now when the item is either gone or no longer shiny and new. But without a true 1:1 macro lens and macro lighting, you may feel you cannot get great shots of smaller objects like we see in home decor magazines. Nothing could be further from the truth. Any zoom that gives you a maximum magnification of 1:4 or better can yield great close-up shots (consult your owner’s manual to see this specification for your lens, or check out the specs of any lens you are thinking about purchasing). And small objects can be photographed beautifully in natural light. Window light is my favorite light for people, but also for things. The harshness of mid-day light is diffused and makes for excellent quality light for a variety of subjects. Take this cute little beaded purse- a favorite possession of its young owner. Sitting at corner table in a small cafe at lunchtime, I couldn’t help but notice how the light from the large window made the sequins sparkle. So from my booth seat, I zoomed in tight enough to catch the detail (and allowed enough of a glimpse of the non-working cell phone that resides inside this purse these days to complete the story!). The shallow depth of field, created due to my close proximity to the subject, keeps the focus on the purse details. (55mm; F/9; ISO 400)

Window Light Portraits

DSC_0628_RT4x6jpg

A few things to keep in mind when taking a portrait of a person or pet by window light:

ONE: Natural window light usually means wide open apertures and slower shutter speeds, so consider boosting your ISO if necessary, be sure your anti-shake mode is on, or use a tripod to prevent camera shake.

TWO: The closer you are to a window, the more dramatic the shadow on the opposite side of the face will be. Positioning your subject further from a window means softer, more even light.

THREE: You can actually stand in front of the window and position your subject facing the window and it won’t cast a shadow! This results in very flat lighting on the face. Four, shoot by a window even if it is overcast or there are soft sheer curtains. The light will be beautiful.

Use Your Flash for Outdoor Photos

fill flash_blog post

We all have heard the rule that early morning and late afternoon are the magical times for talking photos. But let’s face it. At noon, we’re at the pool or the beach. Noon is when the action is happening and when we are more likely to be taking photos. So in order to avoid the raccoon eyes that come with overhead noon time light, just turn on your flash! The small burst of light will fill in shadows and make your subject’s eyes pop out just like it did for my subject. Look at the shot on the left with no flash. Harsh shadows fill in the eye sockets and the shadow is strong across her shoulder and neck. For the shot on the right, I just popped up my built-in flash and it makes a world of difference. To avoide over-exposing your subject, one trick is to dial in a small aperture like F/16 or F/22. For some people, images that use fill flash may appear to be too artificial. If you find the flash puts out too much light, there is a setting on most DSLR cameras whereby you can “compensate” the flash in a plus (+) or minus (-) direction. Dial in a -1 or -2 flash compensation and the flash will emit less light to fill in shadows more subtly. (For that tip, however, you will have to break out your camera manual to find the setting). So next time you’re at the pool or beach this summer, and you cannot get your subject under an umbrella, or tree or some other type of open shade during those harsh hours between 11am and 3pm, then try popping up your flash! (25mm; F/16; ISO200)

Don’t Leave Home Without Your Camera

NYC_STORE_1That’s of course one of the tricks to getting a good photo. Just keep taking pictures! But even when your doing some of the most mundane things, you might just find some perfect light and a child with a great attitude for the day! Here are two shots from our recent overnight in NYC. We went window shopping down in SOHO and while in a furniture store, she sat down while we browsed. When I checked on her, I noticed that the window light streaming in from the high broad windows was beautiful. Her eyes just sparkled when she looked up at me. Of course, I said, oh, you look so pretty, stay right there! The warm tones in the store made it even more beautiful and she cooperated for two or three shots. (32mm; F/5; ISO 400).

NYC_STORE_2
At the next store, there were floor to ceiling windows all around the 2nd floor store. And she picked up a nice prop- a bouquet of artificial sunflowers – and promptly sat on the floor in front of the window. Because I was so close to her, not more than five feet, and used a focal length slightly more than normal (65mm), the flowers are out of focus. (65m; F/5; ISO 400). For both shots, I had my camera in aperture priority mode so that I could always pick the most wide open aperture I could get given the lighting. This way I ensured the background would be a little softer to make her pop out. And I always focus on the eyes (or the eye that is closest to the camera).

Guest Post at Elementally Speaking

BALLERINA

My friend CrisDee over at Elementally Speaking asked if I would guest post for her site where she shares with you ideas for creating, capturing and keeping family memories.(see the post below, or at http://elementallyspeaking.wordpress.com/2009/07/06/new-feature-photo-tips-from-stacie-errera/Thanks Cris!)

When it comes to our children’s stage performances, it is very difficult to get great shots unless you have total access during a rehearsal. The mistake most people make is to take photos from their seat in the auto mode.  If you do this, the flash will go off and you’ll get a dark stage and very well lit heads of the people in front of you.  So sit back and enjoy you child’s live performance with your eyes rather than through your camera’s viewfinder (I know, any of us shutterbugs find this an almost impossible suggestion!).Instead, concentrate on getting a nice shot of your child in costume by venturing back stage during rehearsals or prior to the performance.  I checked on my daughter the day before her recital and saw her costume for the first time.  I was thrilled when I saw the light streaming in from the windows behind the back stage curtains.  I asked her to sit down for a moment with the side of her face parallel to the windows to get nice side lighting on her face.  I then crouched down just a little so that I could see her ballerina skirt spread all around her and her big happy smile.  This point of view also let me include some of the wood floor that her pretty feet danced on the next day and one that really gives the viewer the true picture of what was happening when I took the photo.  Find a place in the environment that has some windows and position your actor or dancer so that the light brings out the detail in the costume and a highlight in your child’s eyes.  Don’t get too close to the window as the light will be too harsh.  Instead, move a few feet or more away from the window for an even light.  I always try to not use the flash and opt for natural light whenever possible.

Communion Portrait

COMMUNION PORTRAIT

I love window light. In the Italian restaurant where we celebrated this boy’s first holy communion, a bank of windows with translucent shades was near the kids table. I asked him to take a minute and stand near the windows, using the wall treatments as a colorful and classic background that leads your eyes right to the subject’s face. I set the camera to aperture priority and dialed in the widest aperture opening I could (F/4.2). The ISO was set at 400. And since the light was low, I turned on the anti-stabilizer on the lens and was able to get a sharp image at 1/30th of a second (gotta love that VC!). The natural light really lets you see the details in his dapper suit and his beautiful rose corsage. And his dark eyes sparkle from the window light. It took more than a few shots to get a natural smile, and I did it by asking him to close his eyes real tight and then open them. He giggled after making a goofy face and I was able to catch a pretty natural smile.