
Window light is one of my favorite ways to take portraits and still life shots as you well know since my blog entries frequently feature this type of shot. I felt by sketching out how I position the camera and the subject might be helpful. I am going to ask you to not laugh at my funny sketches, but I am sure you will not be able to help yourself. I laughed too as I was making the card.
Tag Archives: people pictures
Take a Candid Holiday Portrait by Window Light, and Add a Prop!
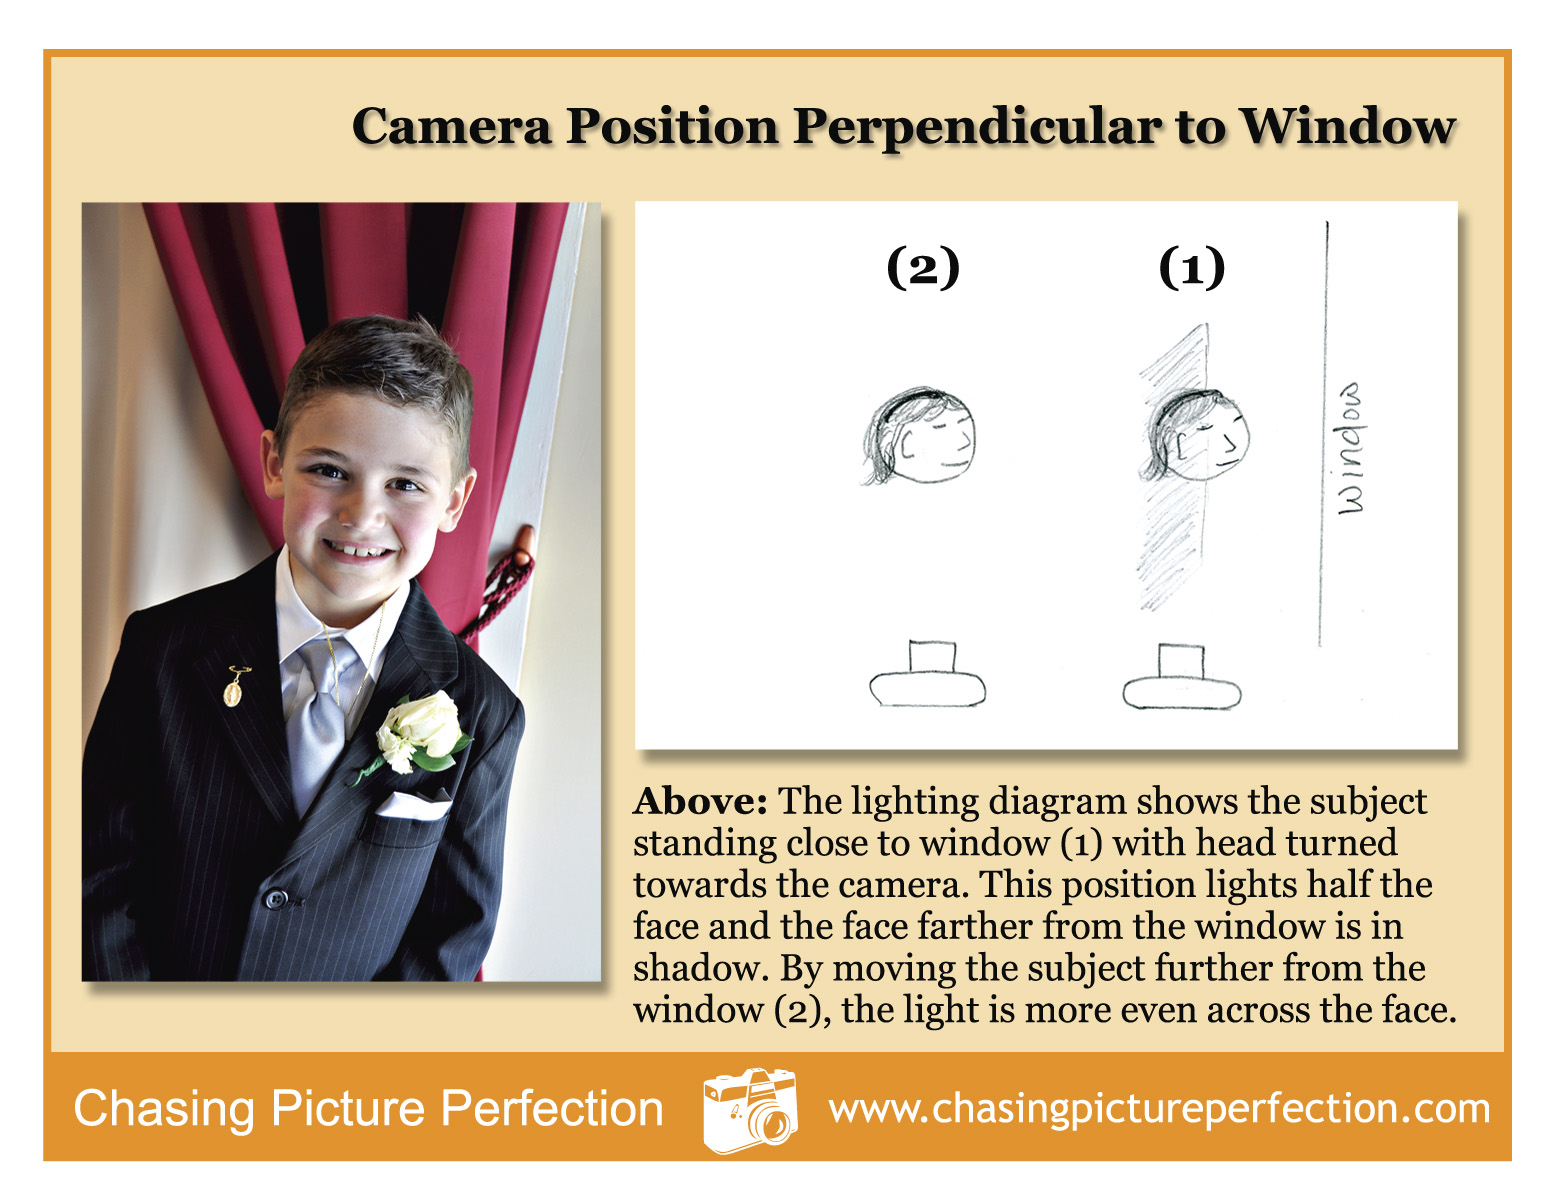
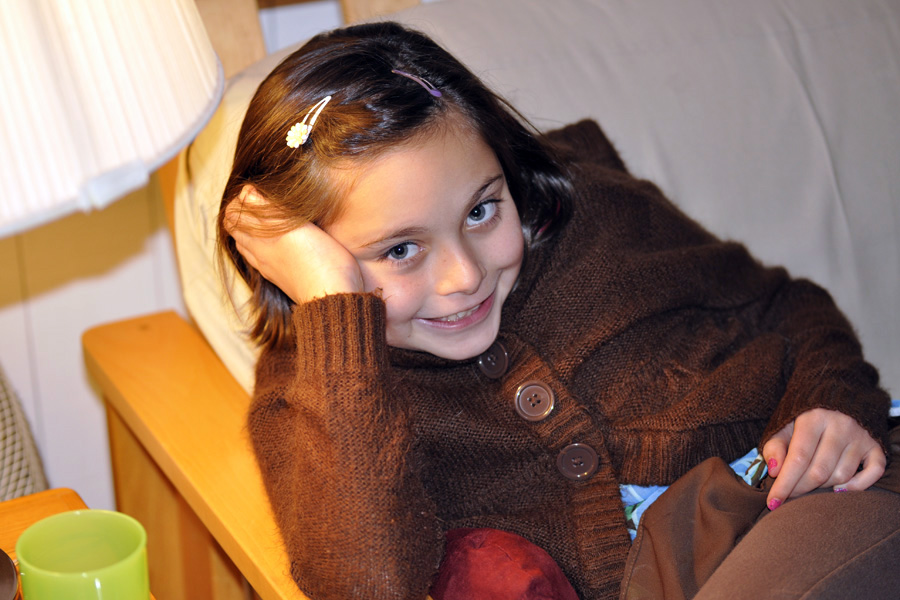
 The window is your best photo accessory for portraits. It’s so easy to use, always there, you don’t need an assistant to hold anything, and you don’t have to pull out your auxiliary flash. I just love the light that streams through my windows in several rooms. Positioning your subject very close to the window, like in the shot at left from early Easter mornning, can give you a nice dramatic light since the light falls off the opposite side of the face quickly and the eyes have a nice sparkle from the window catchlights. To get more of an even light, move your subject just a further away from the window (as in the first photo below- the subject was across the room from the window), or, face your subject perpendicular to the window instead of parallel. In this case, you can actually stand right in front of the window with your subject in turn in front of you and you will not block the light! See this post here for an example of this type of positioning. You can also “fill in” the other side of the face with a pop of the flash as you can see in the second photo below. If you find there is still a slight “artificial” feeling, you can adjust how much light the flash puts out by adjusting the flash +/- button usually found near the flash. Hold the button in and dial it towards the minus side. Perhaps -.7 or -1.0. Review the flash section in your camera manual to see exactly how to set this on your camera. And don’t foget to add a prop that gives your portrait a sense of time. In my case, the tulips scream spring and the eggs of course will remind me this was Easter time when we look back at these photos years from now. (Watch for a forthcoming download card with lighting diagrams for window light positioning).
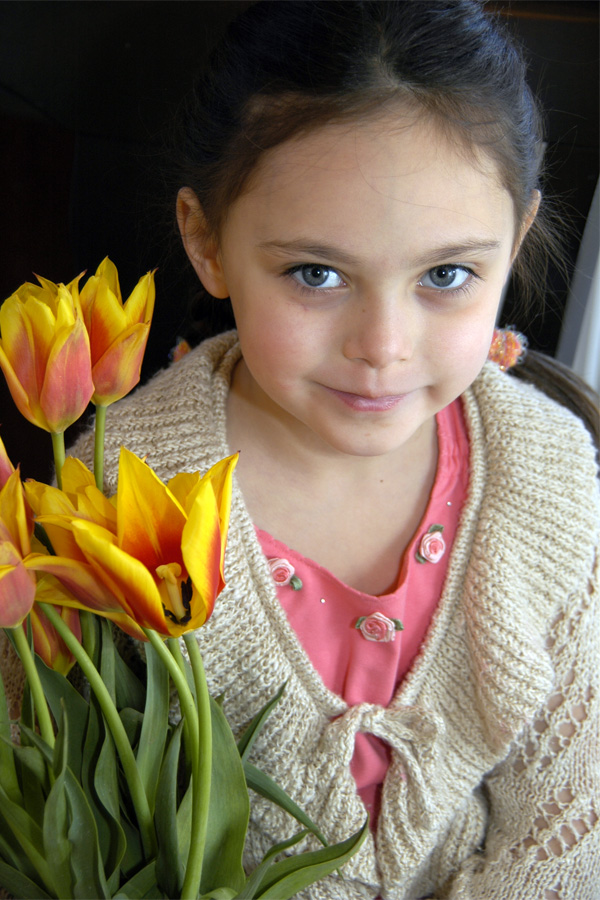
Bring a Symbol of the Holiday Into Focus

I have made this same picture over and over and I still love it. Birthday cupcakes with lit candle, a number of fingers held up to signify a birthday year, a lottery ticket, a dyed Easter egg, and more. This time it’s the four leaf clover my subject plucked from a pot in the yard (look closely since at first glance it looks like three, but it is four). I was actually taking pictures of her cute Valentine’s outfit when she found the clover and held it out to me to inspect. The resulting image is really cute and the clover pops out not only because my aperture was set wide open at F/2.8 and I focused on the clover (thus blurring the background), but also because of the contrast of the green against the red and white of her clothing. So whether it’s your child’s favorite stuffed animal, a perfect test score, or a special holiday object, this effect is a great way to bring focus to the event or milestone while still keeping the subject’s face present in your photos.
Take a Portrait With Shallow Depth of Field
This is a repeat, but one that needs repeating since I think we all want to achieve great portrait shots— even when it’s just a quick candid shot we’re grabbing before the cake is served or before the kids are leaving for school. And using shallow depth of field is a key to great portraits (along with expression, lighting, angle). Shallow depth of field, when the parts of the image in front of and behind the subject are out of focus, makes your subject pop off the image. The example here (a repost from the summer), for instance, shows the eye and smile in sharp focus, yet the tip of the nose, ear and hair are out of focus. Another advantage of shallow depth of field is that you can eliminate distracting backgrounds like indoor clutter, foliage, cars on the street, etc., It makes the background less defined with soft colors.
To get shallow depth of field, the key is to set your camera to the “A” mode: Aperture-Priority. You can leave your ISO setting at 200 or 400 (or higher if the lighting conditions are low) and leave your camera in autofocus. You will then use your thumb-wheel to dial in the smallest number you can, like F/2.8, F/3.5, F/5.6. Focus on the eyes of your subject, or the eye that is closest to the camera. Depending on how close you are to your subject and what lens you are using (telephoto lenses and closer proximity make the effect even more apparent), you will notice that the background is just soft to almost unrecognizable. If you want the photo to have some context of where you are (like cooking in the kitchen), then maybe F/5.6 is a better choice. But if you want the crowd in the background to go really soft, “open the lens wider” to F/3.5 or F/2.8 if you can.Please review the aperture download card here.
Using Flash for Indoor Photography
I have to admit it. Flash is my least favorite type of photography. I suppose since it seems so technical and the results can vary from situation to situation, looking artificial, too dark or too washed out. Luckily, today’s flashes can run pretty much on auto pilot and can be used for creative effect with just a little practice. But this time of year, and for the next four or five months, we’re all stuck indoors a great deal of the time, especially during the holiday season when we take so many candid photos at get-togethers. So I thought I’d share just a few basic flash tips to improve your indoor photos:
1) Your pop-up flash, the one that is part of the camera and pops up automatically if you are shooting in the “green box” total program mode, can cover just a short distance. Most of the time, any subject further than ten feet cannot get enough of the flash illumination for a properly exposed shot and that is why they look dark. You can boost your ISO to higher than normal (try 800 or 1000) to try and get more reach.
2) When you position your subject too close to a wall and use your pop-up flash, you are bound to get harsh shadows behind your subject. Eliminate this by having your subject step a few feet away from the wall and by shooting from a little bit above the subject (which is also a more flattering angle for portraits).
3) Your pop-up flash can cause red-eye quite often. This is because the flash is so close to the lens. It is worse on point-and-shoot cameras than DSLR cameras, but typical in either case. To eliminate red-eye, you can use the red-eye reduction function that throws out a pre-flash to make your subject’s eyes close down, but I find often that people think you’re done and move before the photo is actually shot. You can also try turning up the lights in the room to help the iris naturally close down a little.
4) If you are in a very dark room, the camera/flash may over-expose your subject (you know, the white face that appears to have nothing but eyes and lips) since the camera reads the room as very dark and wants to make it brighter. This also happens if you are too close to your subject. One solution is to back up to correct the latter, and turn up the room lights if you can for the former. If you cannot control the lighting, try moving your subject closer to a room light like I did above.
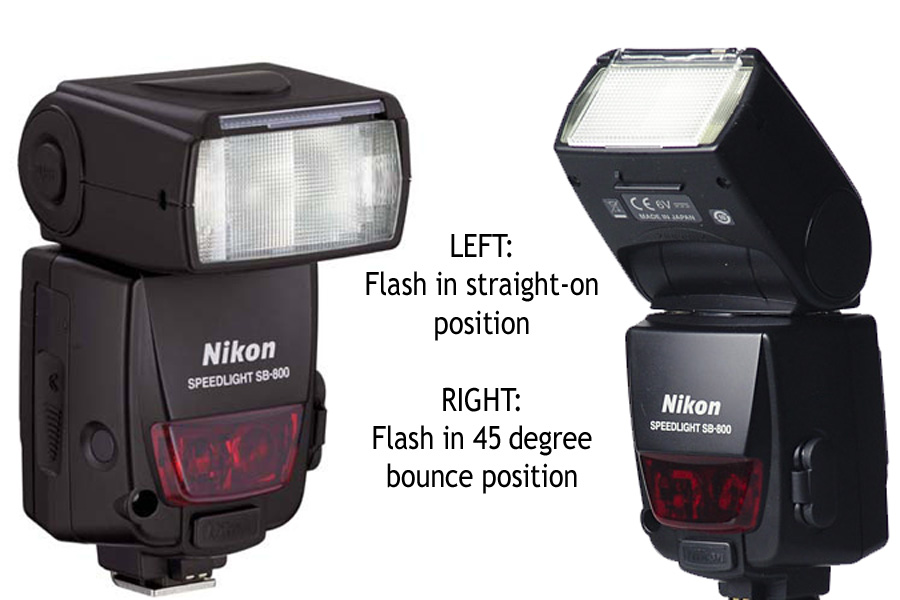
An on-camera auxiliary flash, like the one for my camera shown above, elevates the flash away from the lens and helps to reduce red-eye dramatically. This type of flash also helps in other ways: a) it can throw the flash further allowing you to be further away from your subject; and b) you can change the position of the flash to get more even lighting with much less shadows. This is called “bounce flash.”

{bounce flash}
The photo above of my very Thanksgiving-weary subject was taken with the auxiliary flash in a bounce position. The flash bounced off of the ceiling and back down onto my subject. You can see the lighting looks much more natural and softer than in either of the two photos below where the shots look more artificial and harsh. In the photos below, you can also see the harsh shadow under the lamp and on the futon frame. And, there are hot spots on her cheeks. You can also see how quickly the flash “drops off,” meaning the couch gets darker, whereas in the photo above, the couch and subject are all evenly illuminated since the bounced flash showers the whole area with light. One caution–always bounce off of a white wall or ceiling as the flash will take on the color cast of what it is being bounced off of (e.g., a green ceiling will produce a ghoulish effect).
{pop-up flash on camera}

{straight-on auxiliary flash}
Like learning how to control your depth of field to blur backgrounds, mastering your flash is a must for anyone who is looking to take better people photos. So this season, try to remember some of the tips above when shooting your flash candids at family gatherings. And if you can get an auxiliary flash made for your camera onto your wish list, it will be a worthwhile investment for many years.
Photos by Candlelight
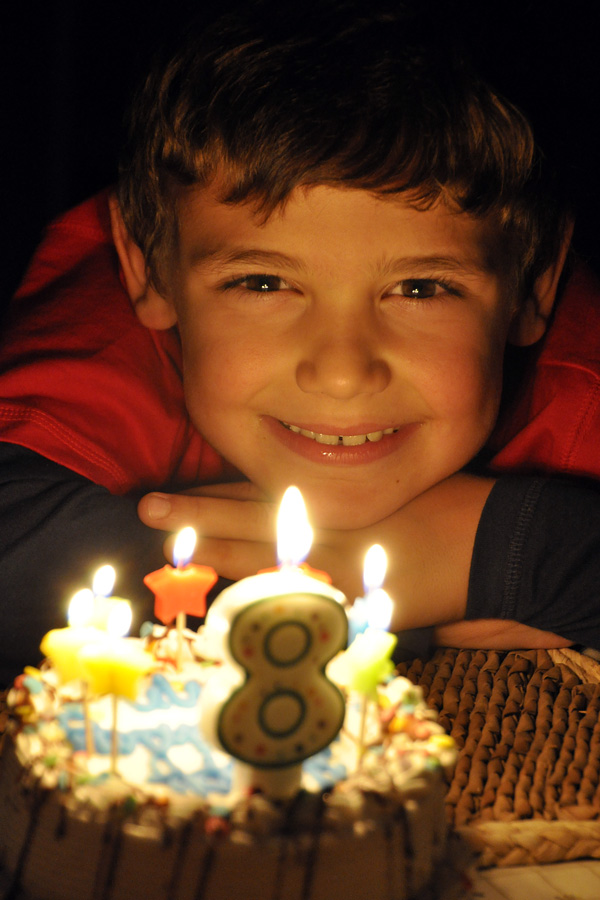
Taking a photo by candlelight can be a little tricky. But boosting your ISO and opening your aperture to its widest opening can really help. In this photo, I asked my subject to move his face close to the cake (but not so close as to get burned). My ISO was set to 1600 and my aperture at F/5.6. I held my camera as steady as possible and used the image stabilizer on my lens. I metered on his face and zoomed out a little to compose and focus. The result is a warm image from the candles, and a nice highlight in his eyes. Use a high ISO and position your subject close to candles for any birthday celebration, or for the lighting of the menorah this holiday season.
Change Your Position for Better Photos

Just like changing the scenery can give us a whole new outlook and change our mood, so does changing your position when taking a photo. It is very common for all of us to just shoot pictures from a standing position, but this leads to somewhat boring images. We have all gotten a much better shot just by crouching down or standing on a chair or bench. Not only do you get a whole new perspective, but this helps to eliminate distracting backgrounds for a clean, more professional look. For this shot, I was standing on the bulkhead while my subjects were down on the shore, allowing me to give a real sense of where they are since I was able to show both the sand and the beach grass in the shot. Plus, the busy background harbor was now out of the shot. Look for the next photo tips card download about positioning yourself for better photos to come shortly (see previous photo tips cards: #1 here; and #2 here).
End of Summer Photo Lesson: Shooting in Open Shade

When the sun is really harsh, you can still get wonderful portraits by placing your subjects just inside a shady area. This might be just under an umbrella (like my example of these gorgeous siblings), inside a garage door, inside your house door, under the slide at the park, under the light of the first tree, etc. The key is to not position your subject too deep into the shade. You want all of the light that is just behind you to spill softly onto your subjects. This will give even lighting across the face(s) as well as great light in the eyes. (65mm -cropped; F/5.6; ISO 400).
BONUS Lesson: This second photo was also taken in the open shade of a small umbrella on a very bright beach. Here you can actually see just how close they are positioned to the edge of the shade. But I am throwing this in to illustrate leading lines. Your eye naturally goes to the boy first and follows down the line to the sitting girl, but notice how the lines of the table push your eye right back up again. This is a great way to keep your viewer engaged within the image.(55mm; F/5.6; ISO 400)

Window Light Portraits
A few things to keep in mind when taking a portrait of a person or pet by window light:
ONE: Natural window light usually means wide open apertures and slower shutter speeds, so consider boosting your ISO if necessary, be sure your anti-shake mode is on, or use a tripod to prevent camera shake.
TWO: The closer you are to a window, the more dramatic the shadow on the opposite side of the face will be. Positioning your subject further from a window means softer, more even light.
THREE: You can actually stand in front of the window and position your subject facing the window and it won’t cast a shadow! This results in very flat lighting on the face. Four, shoot by a window even if it is overcast or there are soft sheer curtains. The light will be beautiful.
Use Your Flash for Outdoor Photos
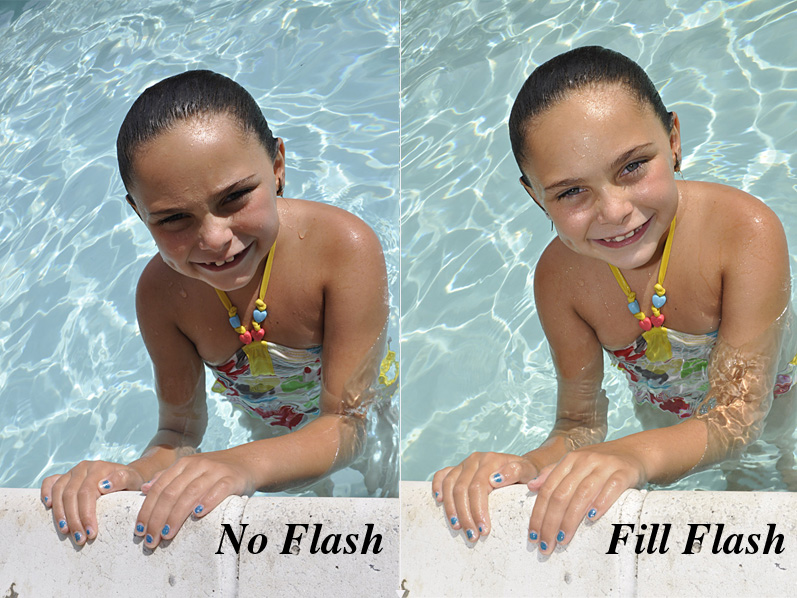
We all have heard the rule that early morning and late afternoon are the magical times for talking photos. But let’s face it. At noon, we’re at the pool or the beach. Noon is when the action is happening and when we are more likely to be taking photos. So in order to avoid the raccoon eyes that come with overhead noon time light, just turn on your flash! The small burst of light will fill in shadows and make your subject’s eyes pop out just like it did for my subject. Look at the shot on the left with no flash. Harsh shadows fill in the eye sockets and the shadow is strong across her shoulder and neck. For the shot on the right, I just popped up my built-in flash and it makes a world of difference. To avoide over-exposing your subject, one trick is to dial in a small aperture like F/16 or F/22. For some people, images that use fill flash may appear to be too artificial. If you find the flash puts out too much light, there is a setting on most DSLR cameras whereby you can “compensate” the flash in a plus (+) or minus (-) direction. Dial in a -1 or -2 flash compensation and the flash will emit less light to fill in shadows more subtly. (For that tip, however, you will have to break out your camera manual to find the setting). So next time you’re at the pool or beach this summer, and you cannot get your subject under an umbrella, or tree or some other type of open shade during those harsh hours between 11am and 3pm, then try popping up your flash! (25mm; F/16; ISO200)