Photo of Grandma Plus Four. Um, Five!

MOTHER'SDAY

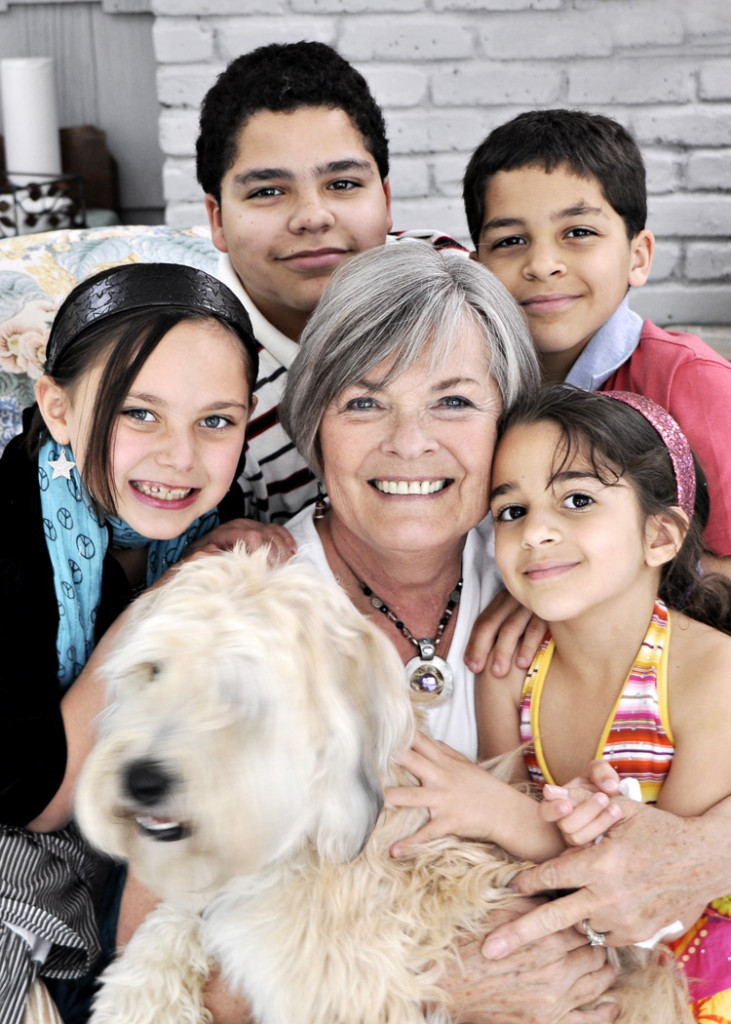
The light filled the screened porch room late afternoon on Mother’s Day. So I put down my Bellini (a cocktail I’d never had before but thoroughly enjoyed) and picked up my camera before the sun went down. Luckily, the grand kids were quite cooperative. I asked the smallest to sit on Grandma’s lap. The older girl sat on the opposite side on the arm of the chair. And I asked the boys to stand behind Grandma. And just as I asked them to all lean in toward Grandma, and the boys to bring their heads and shoulders in a little closer (to prevent them from dropping out of focus), Kelsey decided she wanted in! Kelsey is a Soft-coat Wheaton Terrier newly adopted by my mother. She just wanted to get in on the action. So she was a fifth “person” in the photo, and mom lifted Kelsey up just a little higher to get her head in good position. Then the kids all squeezed in and we got this lovely picture for mother’s day. I did not use a flash. No? No. The highlights in everyone’s eyes are from the beautiful window right behind me. I cropped out the TV in the background to make this a nice 5×7 for Mom’s house, but you can see me in it taking the picture and the window too. So, be sure to always look for a window. Even on an overcast day you’ll get brilliant looking portraits when you use the window as your light source. Two, get the kids (and pet) on several different levels to make a nice composition. Notice how those beautiful smiles make a ring around their beaming grandma! And three, use the stabilizer feature on your lens as I did to get a blur free shot. And four, go with the flow. You never know who might pop into your viewfinder! (ISO 200; 32mm; F/4; 1/25 sec, Auto WB; Aperture Priority)

Father Daughter Portraits

DANCE PORTRAIT

I volunteered to take portraits for the Brownies Father Daughter Dance. Turned out to be 53 girls and their dads! Whew. So Angela volunteered as a second camera. We set-up a make-shift studio in the school hallway by tacking up a sheet and using just one on-camera flash. Not like a pro studio, for sure, but hey, this is the equipment most of us own. So with the father sitting in a chair, and his daughter sitting on one of his legs with her legs in the middle, we asked the dad to put his hands in his daughter’s lap and the girl to put her hands on dad’s. We asked them to put their heads together so there was no space in between. Lastly, we tried to make sure that his cheek was somewhere near her temple. This way, their heads were staggered, a key to good group portraits. You never want to have everyone lined up evenly as it makes for a boring picture. There were several cases where dad came with two daughters, so when adding in the third, fourth or fifth person, ask some stand behind or on the side of dad, as this will ensure all of their eyes are on different level s. And be sure to have all of them close the gaps and move in closer to dad to keep the subject area in the middle. Another trick: since we opened up the aperture all of the way to be sure to blur the background, make sure that no one leans too far forward or too far back as then one of them will not be in sharp focus. Then we stood far enough back (approx 8 feet) to make sure we did not get the floor in the photo and we zoomed in to fill the frame. The flash was bounced off the ceiling. I positioned the flash almost straight up and this eliminated shadows on the backdrop. However, the loss of light from traveling up to the ceiling back down to the subject made the photo appear under exposed, so we just moved the exposure compensation to +2 and the image looked great. Last tip? Iron the sheet! Overall, the portraits came out very nice and everyone seemed pleased. (Tamron 18-270mm VC with VC on, Nikon SB800 bounced flash, ISO 400, F5.6, 1/60th sec, +2 exposure compensation, Auto White Balance).

Communion Portrait

COMMUNION PORTRAIT

I love window light. In the Italian restaurant where we celebrated this boy’s first holy communion, a bank of windows with translucent shades was near the kids table. I asked him to take a minute and stand near the windows, using the wall treatments as a colorful and classic background that leads your eyes right to the subject’s face. I set the camera to aperture priority and dialed in the widest aperture opening I could (F/4.2). The ISO was set at 400. And since the light was low, I turned on the anti-stabilizer on the lens and was able to get a sharp image at 1/30th of a second (gotta love that VC!). The natural light really lets you see the details in his dapper suit and his beautiful rose corsage. And his dark eyes sparkle from the window light. It took more than a few shots to get a natural smile, and I did it by asking him to close his eyes real tight and then open them. He giggled after making a goofy face and I was able to catch a pretty natural smile.

Play with Panning for Action Photos

PANNING_1


I took about 100 photos of Sydney riding her new bike to show what panning is. Panning is when you follow the action at the same rate of speed as the subject, resulting in a blurry background and a sharp subject. I discovered it is not so easy as it sounds. There are several steps to follow in order to get the result:

1) set your camera to Aperture Priority and select a very small aperture like F/22. This slows down your shutter speed to about 1/25th sec depending on how bright it is out;

2) in order to ensure your camera can select a slow shutter speed, set your ISO to 200;

3) set your camera to continuous shooting and continuous AF; and

4) take lots and lots of shots as the action speeds by you parallel to your camera. Pivot your whole body while keeping the camera level, following the action as it passes in front of your camera. Keep your finger on the shutter release button until after the action has passed you.

The background will be streaks of color (the slower the shutter speed, the more streaky). If your subject appears blurry, you are moving slower than your subject. This technique requires lots of practice. So don’t be discouraged your first time out. The images here were shot at varying shutter speeds and the result in each differs slightly. Notice a nice clean background makes the best image, but this technique also helps to make a cluttered background look better.

PANNING_2PANNING_3

Eggs-tra Fun Weekend for Photos

_DSC1188_RT

Like millions across the country, we dyed eggs this past weekend. And took pictures of the whole process. I have about 5 years worth of egg-dying photos now. (I see a big scrapbook collage with lots of 2×2 photos in my future). And each year I try to capture the one with the egg in focus and her face in the background smiling as she shows off her masterpieces one by one. Well, I got the egg in focus, and she’s nicely out of focus in the background. But no smile this year! I set my camera to “A” (aperture priority) and dialed in the widest aperture opening I could (f/5.7 at 97mm) so that the in front of and behind my subject (the egg) would be out of focus. I had my ISO turned all the way up to 3200 so that I would not have to use a flash. I like the result. And the egg went on to be further decorated and then promptly turned into a deviled egg!

Scene Modes? They Really Do Work!

night portrait scene mode

I really feel like I cheated to make this picture on our trip to Mexico last week! I used the “night portrait scene mode” instead of bracketing exposures and playing with the flash to get just the right balance of exposure on her while still having a nice sunset in the background. I had literally a few fleeting seconds of her attention before the sun set below the horizon. So I put the camera on a scene mode, which I never do! And guess what? I got one of the best sunset pictures of the trip!

To Tilt or Not To Tilt Your Photos

DSC_0439_soccer-awards

I admit it. I am a tilter. I just love the little feeling you get that this is a moment captured rather than a posed shot (even when it is, like this one after she got her 6th sequential soccer award–well, every player gets one every season, but special to her nonetheless). To me, slightly or moderately tilting the camera gives the picture energy. The other benefit of tilting is that if you, like me, hardly ever hold the camera really straight (making my images sometimes look a bit “off”) no one notices that the image wasn’t straight to begin with. So I just go with my natural tendency to tilt and use it for effect. Now many people feel tilting is over-done. And it can be. And there is certainly a time when it is not appropriate and can ruin an image. But I like it. And I’m sticking with it. For now. (ISO 800; 55mm; F/4.8; no flash; program mode; auto white balance). PS-can you see the catch light in her eyes? It’s coming from an overhead skylight! So look around for a light source when you are figuring out where you want your subject to stand.

Black & White Beauty

DSC0661BW

I was waiting to catch my limo to take me away from my daughter for 5 days. And I needed an updated photo of her to show off to my colleagues and to look at while the plane took off (since having her I fear take-off and landing terribly). So I took five minutes to sit her on the ledge of our bay window and snapped for as long as she would let me. I made a quick bw print to take with me. But while surfing ThePioneerWoman.com website, I found her photoshop actions and decided to try to make a new black and white today that would really bring out her eyes. I used Black and White Beauty and Boost. I really loved how the light from the window sculpted her face: since she was so close to the window, the side farther away from the window is a little in shadow, which gives the portrait dimension. If she was further away from the window, her face would have a more even tone from left to right. I used a medium telephoto setting combined with an F5.6 in aperture priority mode. That was enough to blur out the patio furniture that was visible outside the window.

Overcast Days Make Great Photos

DSC_4173_RT_4x6

The lighting on an overcast day, even at midday, is ideal for natural and easy candid portraits. My daughter played in the snow, got her cheeks all rosy, and then stopped for a minute for me to grab a couple of shots. I stood back and zoomed in to 120mm to blur out the background and I had no worries about the “raccoon eyes” you might get midday on sunny days since the snow acted as a natural reflector and bounced light back into her beautiful face.

Gotta Love A Big Window

Love this photo of my niece. She’s so sweet and I just want to kiss that face. Seated in a restaurant on an overcast day, soft light poured in the large window to the right. As she conversed with her mom and dad, I shot at a wide F/3.5 aperture setting with the vibration compensation turned on to accommodate the slow 1/25th sec shutter speed. Only when her face was turned slightly towards the window did I get that twinkle in her eyes. Tip: Look for north facing window and position your subject’s cheek toward the window. You’ll get nice side lighting that gives dimension to the face and highlights in the eyes.